
Reply to comment
Arranging Blocks to Customize a Site
Blocks
Blocks are boxes of content that are visible in an area (i.e., a region) of your page—for example the left- or right-hand sidebar. Because each theme has its own default regions, the location of a block depends on the modules and theme you use. Blocks are located on a site on a per-theme basis. To add a new block to your page, follow these steps.
Adding a new block
- Navigate to the Blocks page [Administer > Site building > Blocks].
- Click the add block tab.
- Type a Block description (required).
- Type a Block title.
- Insert the body content in the Block body.
- Set any User, Role, and Page specific visibility settings (optional).
- Click Save blocks.
Although the block is now created, it will not automatically be placed in a region. For the block to be visible on the site, you must identify the region in which you want it to appear.
Configuring a block
The Blocks page provides a drag-and-drop interface for assigning a block to a region as well as the order in which blocks appear. To configure a block, follow these steps:
- Navigate to the Blocks page [Administer > Site building > Blocks].
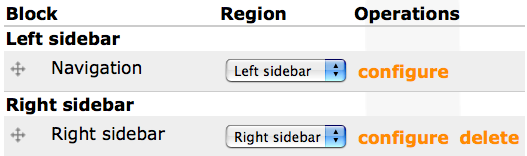
- If necessary, click the list tab. You will see a section of the page with the blocks available and the regions in which you can move them, which should look similar to the following:
- Hover the mouse over the name of the block you want to move.
- Click on the block and vertically drag-and-drop the block into the region in which you want it to appear.
- Click configure to change specific block settings (optional).
- Click Save block.
Deleting a block
Only blocks created by the method outlined above can be deleted. Blocks created by default in a module can not be deleted using this method.
- Navigate to the Blocks administration page [Administer > Site building > Blocks]. Blocks that can be deleted will have a delete link associated with them. (See graphic above.)
- Click delete. You will see a page asking you to confirm this choice.
- Click Delete.
- Click Save blocks.
Reply
- Web page addresses and e-mail addresses turn into links automatically.
- Allowed HTML tags: <a> <em> <strong> <cite> <code><img> <ul> <ol> <li> <dl> <dt> <dd><p><br><h1><h2><h3><h4>
- Lines and paragraphs break automatically.
- You can use Markdown syntax to format and style the text. Also see Markdown Extra for tables, footnotes, and more.
