 Open file. Go to Filter menu.
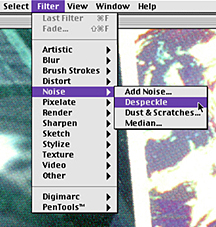
 Drag down to Noise and over and down to Despeckle.
| Removing a Moire Pattern | with - Depeckle | with - Gaussian Blur |
| Adjusting Brightness & Contrast | with - Auto Levels | with - Brightness & Contrast Controls |
| Adjusting Image Colors | with - Variations | with - Color Balance Controls |
| Croping | ||
| Sharping | with - sharpen Edges | with - Unsharp Mask |
Below you will find information for adjusting three critical areas of your image: the brightness and contrast, the color, and the noise reduction (Moire pattern).
Sometimes scanners scan a bit on the dark side or are a bit heavy on certain colors. When you scan from printed sources, a Moire pattern may appear. All of the above factors depend on which type of scanner and materials you use. In many cases, you will want to use your image as it is. But, for those occasions when an adjustment is called for, then it's time for image manipulation software. We have found Photoshop to best suit our needs.
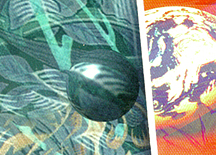
 There are couple of ways to clean up the Moire pattern that often appears in your image when you scan from printed materials. The goal is to get rid of the pattern by blurring it out, without blurring the image too much.
Open file. Go to Filter menu.
Drag down to Noise and over and down to Despeckle.
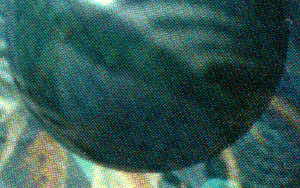
In most cases, you will see the Moire disappear. In some cases, you may have to repeat the process.
 Open file. Go to Filter menu.
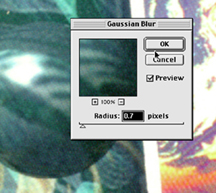
Drag down to Blur and over and down to Gaussian Blur.
You will be presented with the controls window for the Gaussian Blur Filter.
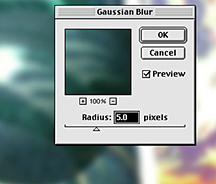
The control window appears with the last adjusment settings still active. In the case above, this setting would be too much and needs to be adjusted. The slider bar is moved to a number that will soften the Moire without obscuring much of the detail.

.
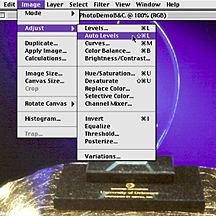 Go to the Image menu
Drag down to Adjust
and down again to Auto Levels.
This option offers no adjustment controls. Photoshop will analyze your image and make the adjustments for you. This may be a good option, but if it is not, you have more controls by using the Levels option.
 Go to the Image menu.
Drag down to Adjust
over and down to Levels.
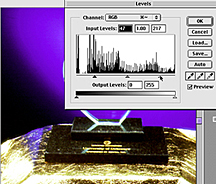
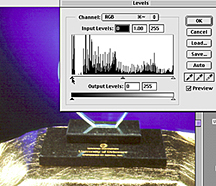 You are presented with the Levels Control window.
In the controls window, you will find a graph illustrating the dark, light, and mid-tone area of the image. Below the graph, you will see three triangle shaped sliders to control each area of the image. These controls allow you to add or subtract more light, dark, and mid-tones to your image.
Be sure to check (so a check mark appears) the preview box so you will see the changes on your screen as you make adjustments.
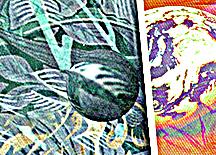
Notice how blotchy the background of this image is.
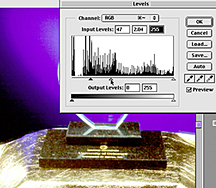
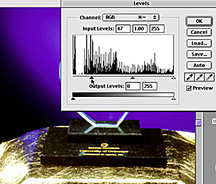 Notice how the dark areas get filled in and turn darker. |
 Notice how the light areas get brighter, but the gradation in the purple mid-tones of the background is less smooth. |
As you move the Dark and Light sliders, the mid-tones move in unison (illustrated above)
but can be adjusted independently (illustrated below).
 As you move the mid-tone slider to left into the dark areas, the mid-tones get lighter. The background gradation is becoming very coarse. | 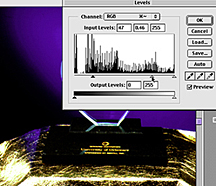 As you move the mid-tone slider to the right you are adding more dark areas to the middle tones. In this case, removing the detail in the stone and very little gradation in the background. |
 The objective is to create an image with areas that are not to dark or too light and too have detail in the mid-tone areas.
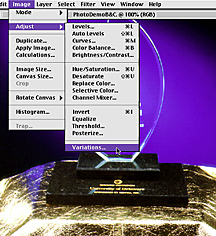
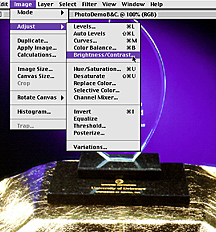 Go to the Image menu.
Drag down to Adjust
and down again to Brightness/Contrast.
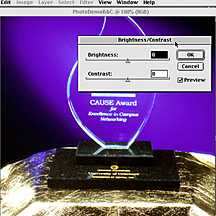 The Brightness/Contrast control window appears.
You will see two slider bars for adjusting your image, one for brightness and one for contrast. Adding or reducing brightness/contrast is as easy as sliding the appropriate bar to the left or right of center.
Be sure to check (so a check appears) the preview box so you will see the changes on your screen as you make adjustments.
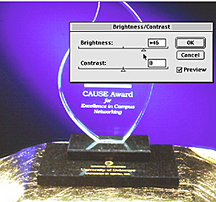 Brightness turned up. |  Contrast turned up, |
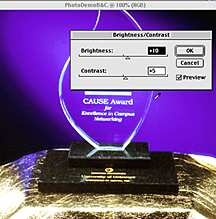 The goal is to brighten a dark image without destroying the contrast or to improve an image with little contrast.
Sometimes when scanning, images will pick up a color cast or are a little on the dark or light side. There is a quick and very visual way of adjusting these types of images in Photoshop.
 Go to the Image menu.
Drag down to Adjust
down to Variations.
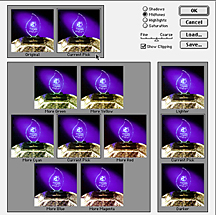 The Variations window appears and presents you with many options.
In the window there are 12 small thumbnails of your image.
They are displayed in a way that will reflect the options listed below it. For example: the "add more red" thumbnail looks more red, the blue option looks more blue, "lighten" is lighter and so on.
The Variations window appears and presents you with many options.
In the window there are 12 small thumbnails of your image.
They are displayed in a way that will reflect the options listed below it. For example: the "add more red" thumbnail looks more red, the blue option looks more blue, "lighten" is lighter and so on.
Among these 12 images is a thumbnail of your original image which does not change, and a current pick thumbnail which displays all the changes you make to the image as you go. This is a nice feature because it enables you to compare your changes against the original.
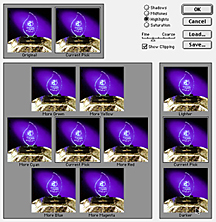 Adjustments are applied to the selected areas of the image by selecting the appropriate bullet. For example, you can change just the highlights or shadow colors by choosing that option.
In this example, the highlights were selected.
You can also lighten or darken these areas of the image by using the lighten or darken thumbnail.
 You can also make adjustments to the increments in which the changes occur by changing the Fine or "Coarse" adjustment. "Fine" makes smaller changes and "Coarse" makes larger more drastic changes. This adjustment works with all the settings available.
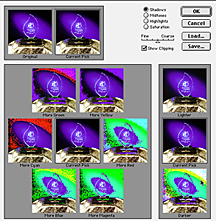
As you move these adjustment controls, Photoshop will show you where trouble spots will occur (by applying a bright color over that area of the image). This is called Clipping.
Clipping is an area that is devoid of color, as in a white hotspot, or colors are unprintable, or there's too much black.
Be sure to check the show clipping box.
In this example, using the middle setting in the shadows shows us that there are many problems in the background of the image. We would not want to darken the shadows with the middle setting. After experimenting with the setting, we would probably choose to lighten the background shadows.
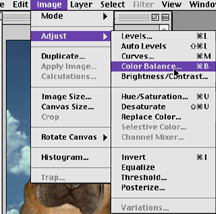 In the Image Adjust Menu
drag over and down to Color Balance
the Color Balance Control window appears
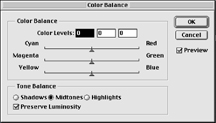 The Color Balance Control window consists of three slider bars for adding or subtracting color from the image, the color sliders are:
Cyan and Red, Magenta and Green and Yellow and blue
The colors work together adding from one color and subtracting from the other.
Another set of controls are located under Tone Balance controls box. These controls allow you to select which area of the image the Color Balance controls effect, the shadow, mid-tones or highlights.
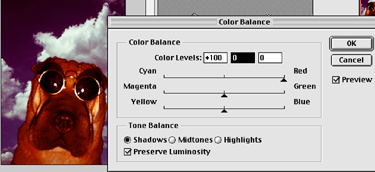 | More red applied only to the shadow areas of the image |
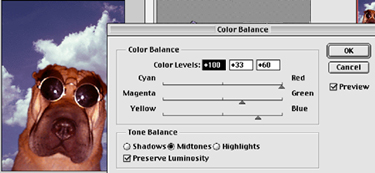 | More color applied only to the mid-tone areas of the image |
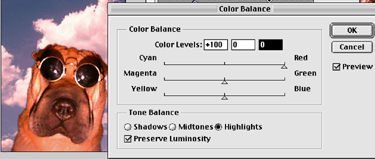 | Red applied only to the highlights of the image |
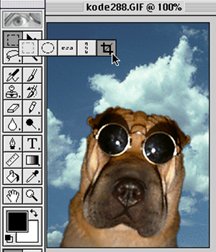 1. Select the cropping tool.
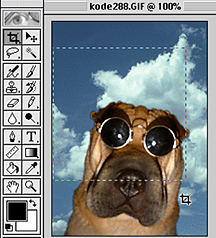 2. Click and drag the Cropping tool around the area to be cropped,
enclosing the area you want to remain intact inside the selection.
2. Click and drag the Cropping tool around the area to be cropped,
enclosing the area you want to remain intact inside the selection.
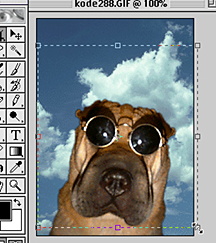 3.The selection can be adjusted by pulling on the bounding box squares.
When you are properly aligned over the bounding box adjustment square, your mouse icon will change to a double-headed arrow.
3.The selection can be adjusted by pulling on the bounding box squares.
When you are properly aligned over the bounding box adjustment square, your mouse icon will change to a double-headed arrow.
 These adjustment squares are located at the four corners and in the top middle and bottom of the selection.
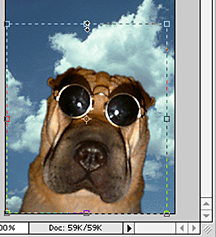
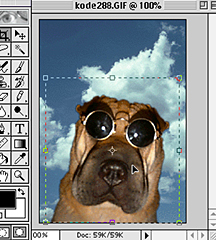 4. When the selection is perfected, move your mouse somewhere inside the selected area, your mouse icon becomes a solid pointer. Once the solid pointer appears, double click your mouse. Your crop is set.
The trick to using the Sharping tools is to use them in moderation. A little goes a long way. You want to make your image pop, not get sharpened away to high-contrast lines, creating a posterized effect.
Photoshop offers you a couple of options in their sharpening tools. One option looks at the image and applies a filter to the entire image. Another applies the effect to what it thinks are the edges of objects in the image. A more sophisticated filter called Unshape Mask, presents you with a controls window, giving you greater control over the filter's effects. Which filter you use will depend on the image you're working with. We'll start with the simplest options first.
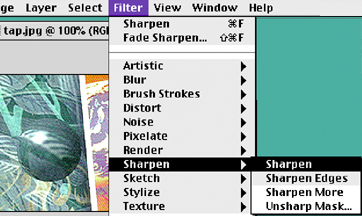
In the Filters menu, Drag down to Sharpen and over to Sharpen or Sharpen Edges.
1. Sharpen will look at the entire image and will sharpen it.
2. Sharpen Edges will do just that: look at the image, find the edges, and sharpen them.
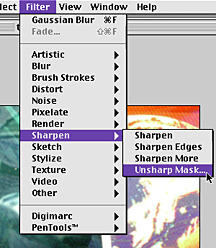 Go to the Filters Menu,
drag down to sharpen and over to Unsharp Mask.
The Unsharp Mask control window appears.
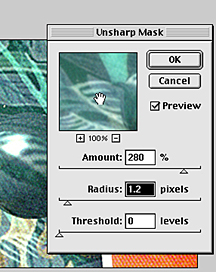 When the controls window appears, it will automatically apply the last setting used for the filter. This may or may not work with your image. In most cases, you will want to make adjusments.
If you move, by clicking and holding the mouse down in the filters preview window, your mouse icon turns into a hand. The preview effects of the filter return to its original blurry state.
In this example, notice how the image in the preview window appears softer than the sharpened image below the controls window.
This will help you to make the proper adjustments.
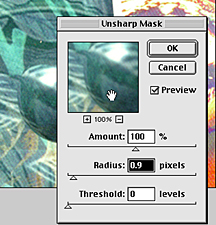 Keep making the adjustment until the image is sharpened without any blaring highlights around the edges of the image.
Amount = how much sharpening is applied
Radius = how many or what portions of the pixels are affected
Threshold = the brightness and contrast of the effect.
| The Graphics Technology Cookbook text links |
||||||
| Digital cameras desktop video and sound |
Web pages | Class handouts and PDF instructions |
Images scanning and printing |
Slides and presentations |
Multimedia and Authoring |
NewMedia User Web Site |