Printing from your own Windows 7 computer to a VendPrint print queue
Reminder
Please be patient when you first run this process because it may take from 1-5 minutes to complete.
- Click the Start button in the lower-left corner of the desktop. You will see a search field labeled Search programs and files.
- Click in the search field and type
run
- You should then see a window with a list of options that looks similar to the following:
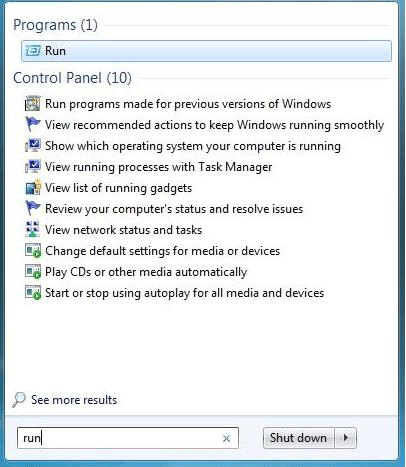
- Choose the Run program listed in the window (in this example, the first option). You should see the Run dialog box.
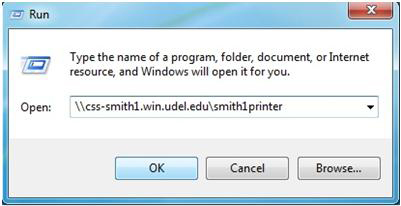
- You will need to type the correct format for the computer site (or kiosk) that you want to print to. For example, the following Run dialog box shows the correct format for the printer in Smith Hall. The correct format for the IT sites and kiosks are listed in the table below.
- Click OK. At first, you will not see any activity on the screen. However, in 1-3 minutes, you will see a Windows Security dialog box that requests a User name and a Password.
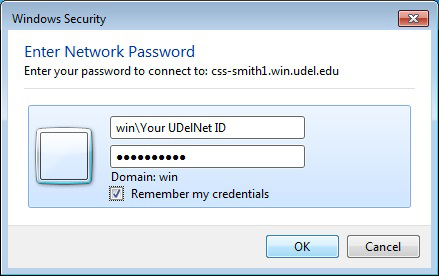
- In the User name field, type
win\Your UDelNet ID
NOTE
You must type the win\ before your UDelNet ID or the printer will not be able to connect. Your UDelNet ID is the first part of your UD email address before the @ sign. For example, if your UD email address is sammy@udel.edu, you would type win\sammy in the User name text field.
- In the Password field, type your UD email password. If you have difficulty logging in, confirm that you have typed the win\ before your UDelNet ID and confirm that your password meets the new requirements by logging in to the UD Network page.
- Select the Remember my credentials check box.
- Click OK.
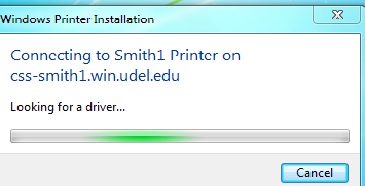
- A progress box will indicate that the computer is Looking for a driver. This process may take up to 5 minutes. The window should look similar to the following:
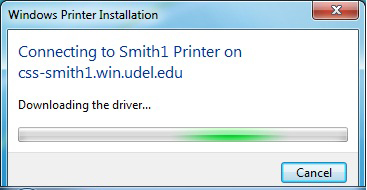
- When the system locates the driver, the window will update to Downloading the driver, which should look similar to the following:
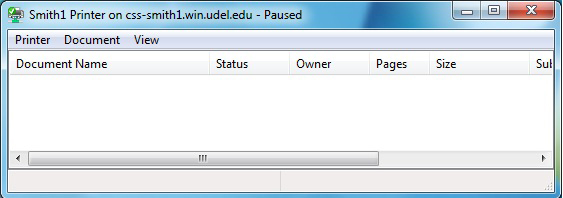
- When the printer is finished installing, you will see the following printer dialog box. Note that the printer dialog box should say that the printer is "paused." This status is just a holding queue until you release your job at the VendPrint station. You may click the X in the upper-right corner to close the window.
Now you can print as you normally do, only select the appropriate printer from your printer list. You have 30 minutes to claim your print job at the VendPrint station before it is deleted. You only need to install the printer once. It will remain on your computer until you delete it.
NOTE
If you have a third party firewall installed on your computer, you may see an error message that your computer can't connect to the printer. If you receive such a message, you will need to open access to the IP address for that printer.
Printer name for the VendPrint print queue for Windows computers
NOTE
To be able to access the printer, you must type the text in the right-hand column into the Run dialog box exactly as it is shown in the table below.
| Location |
Windows computers:
Text to type in the "Run" dialog box |
Campus Printing Kiosks:
Carpenter Sports Building
Christiana Commons
Perkins Student Center
Rodney Commons
Trabant University Center |
\\css-smith3.win.udel.edu\kioskprinter |
| McDowell computing site |
\\css-mcdl1.win.udel.edu\mcdowellprinter |
| Smith Hall computing site |
\\css-smith1.win.udel.edu\smith1printer |
 Search for forms & applications.