Using Personal NAT Routers in UD Residence Halls
Why would you need a router?
Using a personal router in the residence halls is discouraged because improperly-configured routers can cause problems with the UD network for other residents. However, there are certain cases where a personal router is needed.
Case 1:
One exception to this is for residents of Conover Hall, where there is no UD-supplied wireless network. Conover Hall residents should follow steps 1, 3, 4, and 5 listed below to properly and securely configure their router.
Case 2:
The other case would be where you have multiple
wired devices such as a desktop computer, printer, or gaming console that you want to connect to the network. You are required to turn off the wireless functionality on your router to prevent causing interference with the signal for the other residents in this case.
DO NOT use a wireless router to improve your own wireless signal. The University reserves the right to suspend your network access and require you to remove your router if it is not properly set up or is being used inappropriately. If you have an issue with the UD wireless network, please report it to the
IT Support Center so it can be diagnosed and fixed.
Setting up your NAT router
The University of Delaware does not endorse any specific brand of router. You are responsible for following the manufacturer’s directions for setting up the router and properly connecting it to the network. Most new routers will automatically take you through the proper configuration the first time you use them. If your router did not come with printed documentation or an installation CD, check the manufacturer’s website for installation instructions for your particular model or call the manufacturer’s technical support number. The University reserves the right to suspend your network access and require you to remove your router if it is not properly set up or is being used inappropriately.
You may find the generic instructions below to be of assistance. If you have a wireless NAT router, make sure you complete steps 1, 3, 4, and 5 outlined below. If you have a wired NAT router (e.g., so you can connect more than one device to the Internet), make sure you follow steps 1, 2, and 5 below.
If you do not feel comfortable setting up your router, please contact the IT Support Center and ask for a Student Computing Consultant appointment to have them set it up for you.
Step 1: Change the administrative password (All Routers)
Changing the administrative password is important because most routers’ default administrative passwords are freely available on the Internet and could be used to attack your computer or lock you out of your own router. Review the best practices for creating strong passwords. If your router’s setup process does not automatically have you set the administrative password, try these generic directions:
- Disconnect your router from the Internet.
- Connect your computer to one of the router’s local ports (four are usually located on the back of the router).
- Plug in the power to your router.
- Turn on your computer and open your favorite web browser.
- Type the web address found in your router’s instructions in the browser’s location bar.
- Log in to the router using the default username and password given by the manufacturer.
- Change the password (usually in the administration section of the router’s web page).
- Always make sure to save the changes on any page on which you have made a change. If you navigate to another page without saving changes, those changes are generally lost.
Step 2: Disable wireless (except Conover residents)
- While logged into the router as an administrator, go to the device's main menu and click the item (possibly a tab, section heading or menu item) labeled “Wireless” or similar.
-
On this page there may be items referring to "Wireless Mode" or "Radio" or similar. There should be an option to disable the wireless radio somewhere in those settings. Disable the wireless and save your changes.
Disabling the SSID broadcast does not disable the radio. This will still interfere with the UD wireless network.
Step 3: Set up encryption (Wireless Routers)
In addition to having an administrative password for your router, if your router will provide you with wireless connectivity, you should set up secure encryption with a passphrase. If your router’s setup process does not automatically have you set up encryption with a passphrase, follow these generic directions:
- Follow the directions listed in Step 1 above to connect to the web pages on your router.
- If you have logged out from those web pages and need to log in again, log in to the router using the default username and the admin password you created in Step 1.
- Go to the "Wireless" section of the router’s web pages.
- Navigate to a section labeled "Security" or "Encryption".
- Select WPA, WPA‐2, or WPA‐PSK encryption. (Different manufacturers may label it differently.)
- Enter an 8- to 63- character passphrase that you will use to connect your wireless device to your router and, therefore, the Internet.
- Save your changes.
- The first time you connect wirelessly to your router, you will be prompted for your passphrase. Most computers will retain the passphrase for future connections.
Step 4: Change the SSID (Wireless Routers)
You should change the router’s SSID (the name it identifies itself as over the network) to something unique that doesn’t identify you personally. Doing so will reduce confusion in areas where people can “see” multiple wireless routers. (E.g., to avoid people on your residence hall floor seeing three different Wireless Access Points named “Linksys”). See the directions that came with your router, or visit the manufacturer’s web site, or call their technical support line for instructions.
Step 5: Connect your router (All Routers)
After you have registered your computer with UD’s network (http://www.udel.edu/network/) you will also need to register your router for full Internet access.
- Plug one end of an Ethernet cable into the wall jack and the other end into the Internet port on your router.
When you connect an Ethernet cable to your router from the network port in your residence hall room wall, it is critically important that you connect the router’s outgoing port (usually labeled “Internet,” usually set off by itself in the row of ports) to our network. Example of a typical router connector layout: 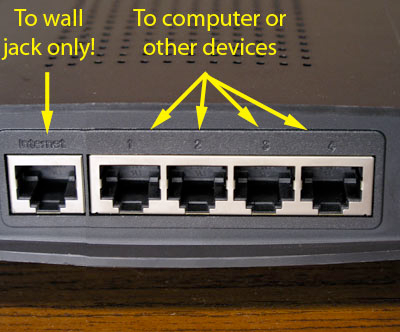
If you accidentally plug the cable from the wall jack into one of the (usually) four device ports on your router, your Internet access may be disabled. Using one of the device ports can interfere with other people’s ability to use our network.
- Plug another Ethernet cable into one of your router’s device jacks, and plug the other end into your computer.
- Open your web browser.
- You will see a web page that will direct you to register your computer. Follow the link on that page to register your router. (Even though you are registering your router, the procedure is exactly the same as if you were registering a computer for Internet access.)
- After about 15 minutes, unplug the power to your router, wait 10‐15 seconds and then reconnect the power. If the network load is heavy, registration may take longer than 15 minutes. If you are unable to connect to an off‐campus web site using your router, wait another 15 minutes and try again.
For further information, consult the website for the manufacturer of your router.
 Search for forms & applications.