How to Check for and Fix Out-of-Gamut Images
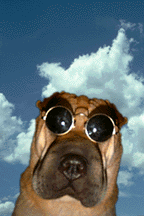
Here is the image we are going to print. The image of the dog wearing glasses was taken with a digital camera. The image was then opened in Photoshop for manipulation. The cloud image came from a photo CD. It was cropped and dropped into the background.
It looks OK, but to be safe, I am going to use a function in Photoshop to check the color gamut.
When you use this function, Photoshop checks the image for all unprintable CYMK colors (i.e, those colors out-of-gamut) displayed on the screen. The colors that are not reproducible on a color printer will be filled with gray or the color you chose in the preferences settings.
1. Open your image in Photoshop
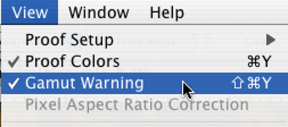
2. Go up to the Menu Item View -> click and drag to Select Gamut warning.
3. Photoshop will process the image
4. When the process is complete, the trouble spots will be marked and ready for your corrections.
 |
To fix the problem areas, select the Sponge from the Dodge and Burn tools in the Tool Bar.
1. Select the Sponge tool located in the Tool Bar.
 It is nested in with the Dodge and Burn tools.
2. When the Sponge tool is activated, its options become available in the Tool Options bar, located at the top of the window.
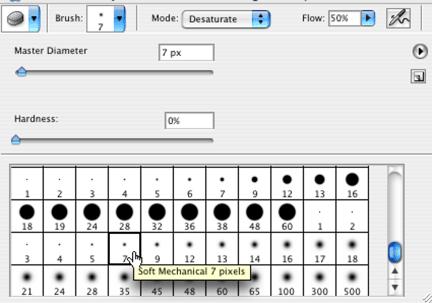
The Sponge tool works in conjunction with the Brush tool. Select the smallest brush size needed to work in the out-of-gamut areas.
3. Click on the Brush tool drop-down arrow to reveal the hidden brushes.
Note: You should change brush sizes as needed while working on the image. You only want to desatrurate the out-of-gamut areas. Using a brush that is too big for the space could desaturate other areas of the image.
After you select the sponge tool, you will need to tell the Sponge tool what to do (Mode) and set the pressure (Flow). These setting control what type and the amount of change that occurs.
4. Set the Mode to Desaturate. Set the Flow (now set at 50%) option, by typing in an amount or dragging the white control triangle until you have reached the desired percentage.
I used a maximum setting of 10% for Flow exposure and less for my image.
Note: Use a very low setting, because you can always go over the area a few times to build up the changes.

Once your setting are where you want them, and you have the correct size brush for the area that needs adjustments, all that's left to do is hold down the mouse and paint over the area in question.
As you can see here, most of the image is corrected. I used the slightly small brush for the larger areas, and chose a tiny one for the tighter areas. The gray area just vanishes leaving, a corrected image in its place.
The changes will take place before your eyes. Remember if your changes are too drastic... Before you do anything else, you can use Command+z to undo the LAST change you made. You can also use Shift+Command+z to step back through the History of steps. How many times you can use this command is set in your preferences
The original image and the corrected one side by side
As you can see, Photoshop removed some of the reds. These reds would not have printed properly to a color printer. In fact, they would have printed in a garish orang-red, which would have ruined the image.
 |