Fix Out-of-Gamut Colors with Hue and Saturation
First off, did you read the out-of-gamut color page? If not, you may want to read it. Here is a short explanation of what out-of-gamut colors.
A gamut is the range of colors that a color device can display or print. A color that may be displayed on your monitor in RGB may not be printable in the gamut of your CMYK printer. For instance, the nice blue on your monitor that prints as purple.
Photoshop has its own color management system that uses your printer profiles to automatically bring all colors into gamut that will print to that profile’s range of colors. But you might want to identify the out-of-gamut colors in an image or correct them manually before printing to your desktop printer or converting to CMYK for a professional print job.
Using Hue and Saturation to fix out-of-gamut colors
The Hue and Saturation Adjustment command will allow you to desaturate or change a color over an entire image or on a selected range of colors. The dialog box has a color slider triangle, and the familiar; single sample, add to, remove from, eyedropper selection tools, and a drop down box that allows for adjusting individual colors. When adjusting out-of-gamut colors you will want to adjust those colors that are not printable on your selected profile.
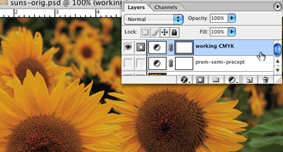
Remember using an adjustment layer from the Layers window, rather than using Hue and Saturation from the Menu, will create a non-destructive layer to the image. As long as you DO NOT flatten or merge the layers. the adjustment layer will always be adjustable. You can have as many as you adjustment layers want, and they will not increase the file’s size. The great thing about this option is you can make an adjustment layer for each of your output profiles and save them with the image, which is very handy if you print the image to various paper surfaces or printers.
1. Open a copy of your image.
2. Choose View -> Gamut Warning.
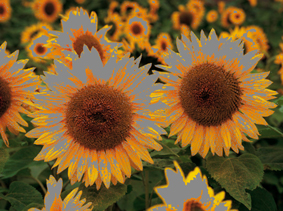
All pixels that fall outside of that particular profile’s gamut will be highlighted.
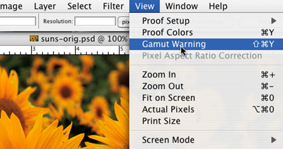
Note: In this case the CMYK proof space is chosen by default.
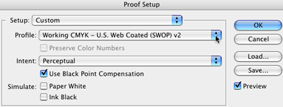
3. Choose View -> Proof Setup; choose the proof profile you want to use.

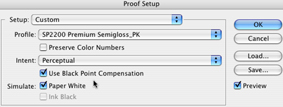 In this example, Epson Premium Semi-gloss Paper was chosen for the profile and the “Use Black Point Compensation” and “Simulate: Paper White” options was used.
Black Point Compensation will visually adjust the differences in black points between color spaces. If it is not checked, some blacks can appear gray.
Simulate: Paper White will simulate the chosen profile paper’s particular shade of white.
Black Point Compensation will visually adjust the differences in black points between color spaces.
If it is not checked some blacks can appear gray.
Simulate: Paper White will simulate the chosen profile paper's particulate shade of white.
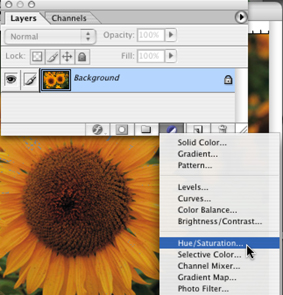 4. In the Layers window -> Click on the New Adjustment Layer icon -> Choose Hue/Saturation.
The new Adjustment layer dialog box appears.
DO NOT edit the image using the “Edit: Master” color option. If you do, the whole image will be desaturated, not just the color problem areas.
Notice the color areas that are covered with the gamut warning. If the image has a number of different colored areas that need desaturating, work on them individually (i.e., yellows, blues, greens, etc.).
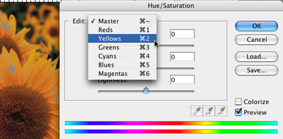 5. Use the drop-down option box to select the colors that need adjusting.
Once a color has been chosen, the Eyedropper tools become available.
6. Select the Plus Eyedropper -> click and drag over the problem areas.
![]() Note how the color range at the bottom of window adjusts as you add more colors to the color range for adjustment.
Note how the color range at the bottom of window adjusts as you add more colors to the color range for adjustment.
Be sure to stay on the gamut warning color, you do not want to desaturate other colors in the image.
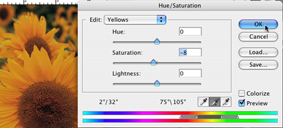 7. Once you are have the problem colors selected, drag the Saturation slider to the left, a little at a time, to bring the color into gamut. Watch the gamut warning color closely as it disappears. Use the smallest possible slider value. You do not want to over desaturate the colors.
If you have other colors to adjust, use the Edit: drop-down option to select the next color and repeat numbers 6 & 7 until all color is corrected.
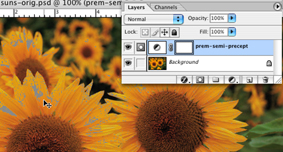
8. Click OK when you are finished with all colors. You can readjust what you’ve done at any time by double clicking the icon in the Layers window. It’s a good idea to name this adjustment layer with the name of the proof profile it was corrected for.
 Note: If you intend to print the file on various papers and you switch to a different proof space, you will see that the Hue and Saturation Adjustment Layer may have corrected some of the new space's gamut problems, but not all of them. Additional, you may have Desaturate areas that were in gamut in the new space.
As mentioned above, you may choose to have an adjustment layer for each of your most often used papers.
 1. Change the Proof Space to the new profile.
2.Turn off the visibility of the previous adjustment layer and add a new one.
3. Make the needed corrections for that new profile.
4. Rename the Layer with the profile name.