Setting Black and White Points for Printing
Therefore, it is important to know the limits of your printer, inks, and favorite paper types. You should experiment with these items, so you can see these limits and use them to adjust your images before printing. I have included a 5x7 inch, 300 dpi, RGB tiff image that you can use for this purpose.
One important task similar to traditional darkroom work is note taking. If you want to create consistent results in your digital darkroom, you MUST keep very good records of how you printed your images. All settings should be noted: paper type, page set up, print settings, resolution, etc. Most importantly keep track of any adjustments to the Color Management and color control settings. Lastly, make sure you are not sending mixed messages to the printer. Choose settings to have either the printer or Photoshop print the file, NOT both.
How to Use the Test Print
1. Open test file -> Set the printer to print with preview.
2. Choose setting for Printer Color Management, or Adobe RGB out-put,
proper paper size, and layout.
3. In the Print Settings Set the proper type of paper, turn High Speed OFF,
set resolution, etc.
4. In the Color Management Options, choose the proper setting for your chosen method of printing (i.e., Printer Color Management = Choices or Adobe RGB= No Color Adjustment).
5. Note all settings.
Repeat the process using other print options you’d like to try (different Color Management options or printer recommended settings) for each paper type you use.
After you make a few test prints, you will probably see a big difference between the different settings and paper types. For instance, on my Epson 2200 I can start to see the blacks last noticeable color change at about 94% on Premium Luster Paper with Photoshop handling the color, and 100% on the same paper with the printer managing the color with the ColorSync option selected. The results are noticeably different on Epson Glossy paper.
Keep these tests as references for adjusting the black points out-put sliders in a Levels or Curves adjustment layer.
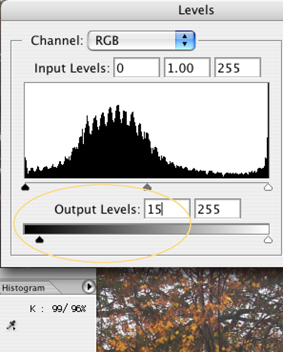
How to Adjust Your Image Output Levels
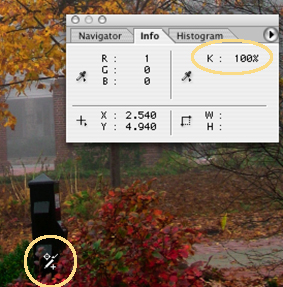 Before you print your files, you should use your paper samples to judge where your black starts blocking up. Then use the Eyedropper tool to sample the darkest shadow areas of the image. If any of the image’s shadow percentage value is over the limit on your printer and paper combination, you should adjust the black out-put settings to be within their limits.
In this case, I have 100% black and the paper I am going to print to stops noticing the difference at about 96%. I will need to adjust the out-put settings so the darkest blacks will be at about 96%.
I can do this with a Curves Adjustment Layer or Levels Adjustment Layer.
Using Curves, you can make this adjustment using a percentage value. Using Layers you would have to calculate the percentage necessary. Because the highest value is 255, you would use a value of 2.5 for every 1% adjustment.
How to Use Curves
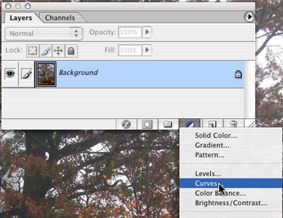 1. Add a new Curves Adjustment Layer from the Layers window.
The Curves dialog box appears.
 Generally the Input and Output controls are set to numeric values, with the darks placed at the bottom left.
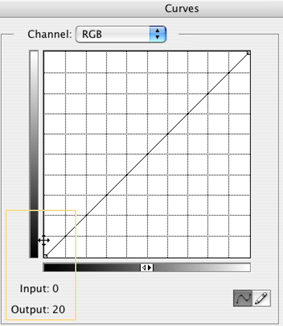
 2. To have access to the Percent value controls; click on the gradient bar below the grid, which has a double-headed arrow in its center.
3. Click the mouse on the shadow control handle to activate the Output box and adjust the shadow areas.
Percent symbols should now appear next to the value boxes.
Highlight and shadow positions have been reversed on the grid: Black is on the top.
 4. Type in the percent value or drag the control handle until the proper value appears in the Output box.
You can also click the mouse over the word Output and drag left or right to change the value.
Note: You can sample the shadows with the Eyedropper tool in this window as well. If you move the cursor, click the mouse, and drag over the shadow areas on the canvas, it turns into the eyedropper tool. The values for the sampled pixel will appear in the Output box. Additionally, a spot will appear on the control line to indicate that pixel’s value on the curve.
Doing the Math to get the Output Value
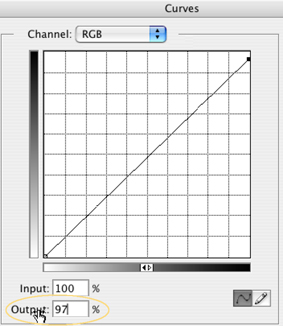
You may have an image with shadow readings at 100%. However, your printer and paper combo stops showing a visible difference in the black gradation at 96%. To get the number value for the Output settings, you would take the number of percentage points you want to change and multiply it by 2.5. You will have to round the value up or down as needed.
In this case we need to go to 96 from 100, which is 4 percentage points. That calculates to a change of 10 (4x2.5 =10). If you hate doing the math, keep good notes on your paper test prints.
How to Use Layers
After sampling the shadow areas of the image to see if they fall into the range of your printer and paper, do the math to convert from percent to a number value.
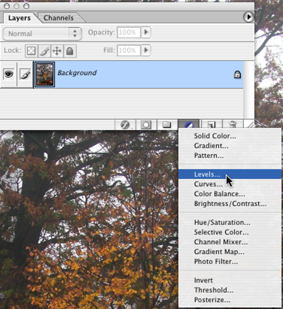 1. Add a new Levels Adjustment Layer from Layers window.
The Levels dialog box appears.
 2. Type in the desired amount or drag the shadows Output controller (black triangle) until the amount appears in the Output Levels box.
Click the OK button when the setting is correct.
White Points
The test strips will also show you the limits of the printer’s ability to print in the light gray areas.
When sampling your image for black point adjustments, sample the whitest areas of your image. If any of the white areas read 255, no ink will cover that area of your printed image.
You may want adjust the white point based on your test strip results so that all areas of the image are covered with a small amount of ink.