
Thunderbird: accessing a shared mailbox without Exchange
NOTE
You must have set up your shared mailbox before accessing it with Thunderbird.
These instructions will help you create a shared mailbox for Thunderbird. Follow the instructions to install Thunderbird for the first time if you haven't installed Thunderbird before. If you are upgrading from a previous version of Thunderbird, or if your account isn't working, verify your account settings.
I'm installing Thunderbird for the first time
Follow these steps to set up an shared mailbox if you have NOT installed Thunderbird before.
- Start Thunderbird. You will see the
Mail Account Setup window.
NOTE
If the Mail Account Setup wizard doesn't automatically open, go to the Tools menu and click Account Settings. Under the left panel,click Account Actions, and then choose Add Mail Account.
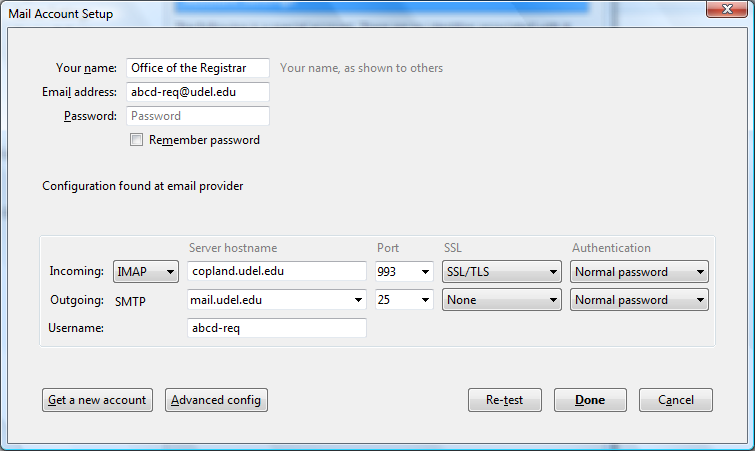
- In the Your Name field, type the name of the department using the shared mailbox (e.g., Office of the Registrar).
- In the Email Address field, type the email address that clients use to send mail to this shared mailbox (e.g., abcd-req@udel.edu).
- Do not type a password.
- Click Continue.
- Thunderbird will try to
automatically detect the settings for
your account. Wait for the auto
detection to complete, and then click
Edit.
- Change the Username to your UDelNet ID (i.e., the part of your email address before the @udel.edu—e.g., maryqq).
- Change the Incoming field to copland.udel.edu.
- Verify that the Incoming server is set to: IMAP, port 993, and SSL/TLS.
- Change the Outgoing field to mail.udel.edu.
- To the right of SMTP, verify
that the port is set to 25, and
then choose
NONE. Your screen should
now look similar to the
following:
- Click Re-test Configuration. When the auto detection completes, you should see two green buttons indicating a successful setup.
- Click Manual Setup to modify the
settings.
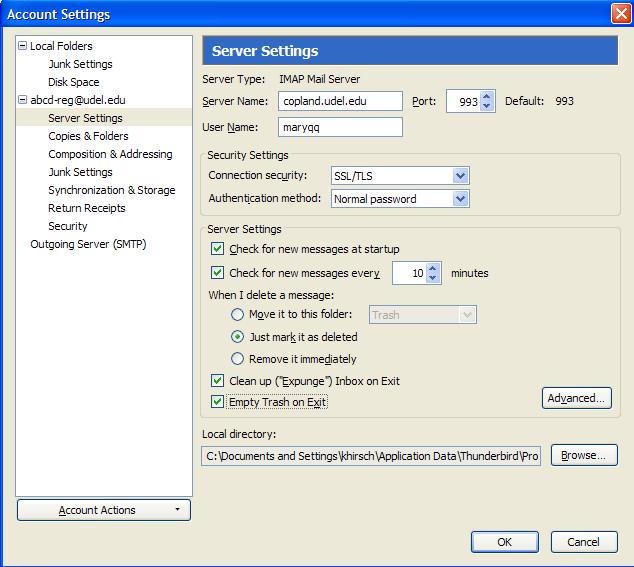
- Under the email address for your shared mailbox in the left panel, click Server Settings. If you don't see Server Settings listed under the account, click the plus sign to the left of the email address for your shared mailbox.
- Use the following recommended
settings, or change them according
to your preferences:
- In the When I delete a message section, choose the Just mark it as deleted radio button.
- Check the Clean up ("Expunge") Inbox on Exit and Empty Trash on Exit check boxes.
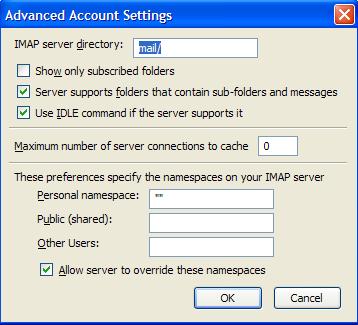
- Click Advanced to change the
advanced server preferences.
- In the IMAP server directory field, type mail/.
- Uncheck the Show only subscribed folders check box.
- Click OK.
- On the left panel, click Outgoing
Server (SMTP) to change the outgoing
mail server settings.
- If there is more than one
outgoing mail server that has
"mail.udel.edu" as part of the
name, choose it, and then click
Remove.
NOTE
You cannot delete the default outgoing mail server. You can use the Set Default button to reset your default server.
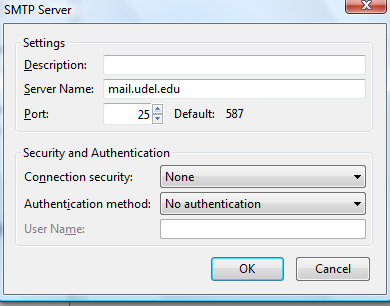
- In the Outgoing mail server list box, choose mail.udel.edu (this may be prefaced with your UDelNet ID or shared mailbox name). Click Edit.
- Verify that the Port is set to 25 and that the Connection security is set to NONE.
- From the Authentication method drop-down list, choose No authentication.
- Click OK.
- Click OK again.
- If there is more than one
outgoing mail server that has
"mail.udel.edu" as part of the
name, choose it, and then click
Remove.
I'm upgrading from a previous version of Thunderbird, or I'm having problems with the instructions above
Follow these steps to verify your settings if you've upgraded from Thunderbird 2, or if your settings from the steps above don't work.
- From the Tools menu, click Account Settings.
- In the left panel, click the email
address of your shared mailbox. Verify
the following settings:
Your screen should look similar to the following:Field Value Your Name Your department name (e.g., Office of the Registrar) Email Address Shared mailbox email address (e.g., abcd-req@udel.edu) Organization Name (Optional) University of Delaware

- In the left panel, click Server
Settings. Verify the following
settings:
Your screen should look similar to the following:Field Value Server Type IMAP Mail Server Server Name copland.udel.edu Port 993 User Name Your UDelNet ID (e.g., maryqq) Connection security SSL/TLS Authentication method Normal password When I delete a message Choose Just mark it as deleted (recommended) Clean up ("Expunge") Inbox on Exit check box Checked (recommended) Empty Trash on Exit check box Checked (recommended)
- Click the Advanced button to verify
your advanced incoming server
preferences:
Your screen should look similar to the following:Field Value IMAP server directory mail/ Show only subscribed folders Unchecked Server supports folders that contain sub-folders and messages Checked Use IDLE command if the server supports it Checked Allow server to override these namespaces Checked
Click OK. - On the left panel, click Outgoing
Server (SMTP). From the window on the
right, choose outgoing mail server, and
click the Edit. Verify the following
settings:
Your screen should look similar to the following:Field Value Server Name mail.udel.edu Port 25 Authentication method No authentication Connection security drop-down list None
Click OK.
Click OK again. - When you first log in, you may be
prompted to add a security exception.
- Check the permanently store this exception check box.
- Click Confirm Security Exception.
