In lab02 you learned some basics of JavaScript. We saw the concepts of expressions, order of operations, assignments statements, variables, operators and operands, dot syntax (objects, methods and properties).
In lab04, how JavaScript could be included in a web page as an event handler, and how JavaScript can be extended by loading new function definitions (e.g. the new function dayOfWeek()).
In lab06, we saw several new things:
document.write() to put the value returned by the dayOfWeek()into the content of a web pagejs> prompt) If you need a refresher on any of these concepts, review lab02, lab04 and lab06
In lab07, we learned about DOCTYPEs, meta content-type tags, and HTML validation. You will need that understanding for this lab, so if you need to review lab07, do so before starting lab08.
In this lab, we'll:
Create a new subdirectory:
~/public_html/cisc103/lab08 |
for web content we create in this lab |
There are no files to copy for this week's lab.
Last week we developed a function called areaOfPizza.js. This file should be in your ~/cisc103/lab06 directory. This week we are going to incorporate that function into an interactive web page.
Make ~/cisc103/public_html/lab08 be your current working directory.
Then copy ~/cisc103/lab06/areaOfPizza.js into that directory.
(What are the Unix commands to do this? That would be a good exam question. Hmm...)
Create a file called pizzaCalc.html in the ~/public_html/cisc103/lab06/lab08 directory. You can use whatever method you prefer:
Inside the file:
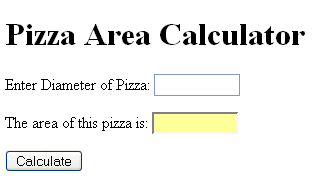
Pizza Area CalculatorPizza Area Calculator<!DOCTYPE ... > declaration and <meta http-equiv="Content-Type" ... > tags that you used in lab07, so that the page can be validated at http://validator.w3.orgThen, after the h1 element insert the following element:
<form>
<p>Enter Diameter of Pizza: <input type="text" size="10" name="diameter" id="diameter" /></p>
<p>The area of this pizza is: <input type="text" size="10" name="area" id="area" readonly="readonly"/></p>
<p><input type="button" value="Calculate" onclick="calculateAreaOfPizza()" /></p>
</form>
This places a form element in the page. It should look something like this when you are done:
There are several things to understand inside this form element, and we'll cover some of them in lecture.
The most important one for you to understand before proceeding is this:
the purpose of the onclick attribute of the <input type="button"...> element.
onclick attribute is calculateAreaOfPizza();calculateAreaOfPizza(); represents a JavaScript function call. <input .../> element (the one with id="diameter") areaOfPizza.js file (from lab06)<input .../> element (the one with id="area)Note that the second <input .../> element—the one with id="area"—is really functioning as a place we are storing output ,i.e the result of our calculation.
This is confusing and unsatisfying, but we have to just live with it. It is an oddity of the way HTML names things. Many of the useful things you can put into an HTML form are called <input ... /> elements of one type or another, because they are usually used for input. Occasionally, we use one for output, and we have to just keep our heads on straight about the potential confusion that may arise.
In a later step in the lab, we'll need to define the calculateAreaOfPizza(); function so that when you press the button, something happens. This function will be used as the event handler for the button.
In the meantime, since it isn't defined yet, when you click the button nothing will happen—or at best, what will happen is that you'll get an error.
In Firefox, this error appears in the Error Console, which can be accessed from the Tools menu of Firefox. Familiarize yourself with the error console now, because you'll need it when working with JavaScript! Typically, you need to do four things when working with the error console:
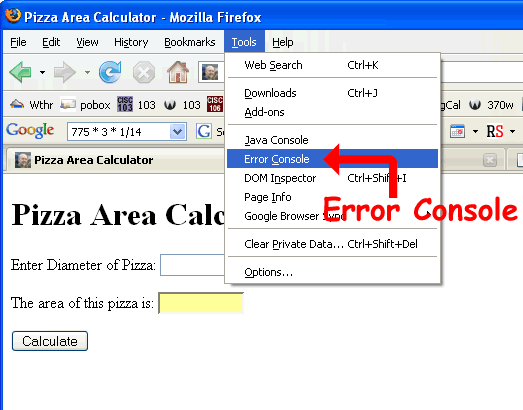
If you follow the four steps above with your HTML file as written so far, you should get something like this.

This indicates that calculateAreaOfPizza is not defined. So our next step will take care of that.
calculateAreaOfPizza();So, now we go back to the script element at the top of the page to add the function definition for calculateAreaOfPizza()
At first, we'll just ad a "dummy" body for this function that just puts up an alert box on the screen. This won't do anything useful, but it will give us a way to know whether the event handler is working.
Then, once that bridge is crossed, we'll actually hook up the event handler to the data from the form, and the areaOfPizza function we've defined.
So, to start, add an empty script element somewhere inside the head element. It should be nested inside the head element as a "sibling" to the title element (i.e. next door to it, either before or after it). It should look like this:
<script type="text/javascript">

</script>
Inside the script element, you'll put a JavaScript function definition for an event handler. That will look like this. Note the comment on the line before the function definition—that is considered essential for good style. For now, we leave the function body empty—that is, the part between the opening brace and the closing brace ( { } ).
// event handler for "calculate" button---gets data from form and calculates answer
 function calculateAreaOfPizza() {

}
Next, we add a dummy function body for the time being—this allows us to see if the event handler is working. That dummy function body will consist of one line:
window.alert("The calculate button was pressed!") ;
That goes inside the function definition body, so the entire function definition looks like this:
// event handler for "calculate" button---gets data from form and calculates answer
function calculateAreaOfPizza() {
   window.alert("The calculate button was pressed!") ;
}
Notice how the body of the function is indented by three spaces—this is essential for good coding style. It makes your code easier to read and understand. Style is one of the things you will be graded on when you submit JavaScript code for grading.
The indentation is not, however, necessary for the code to run—so this means that just because it works doesn't mean it is perfect. It must also follow good style principles that make it easy for a human being to read, understand and make future changes to your code. That's what the indentation is all about.
Now, see if it works. Try clicking the button. You should get something like this:
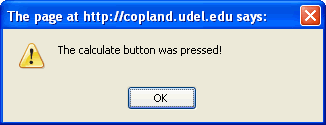
If so, then your event handler is working—you can move on to the next step!
calculateAreaOfPizza();A more useful function body for calculateAreaOfPizza(); is one that pulls the value out of the form, does a calculation, then fills the value back into the form element. That function body appears below, so type it in next. As you type, read what you are typing, and try to make sense of it, in terms of things we've talked about before such as:
Note that this JavaScript code MUST go in a specific place—so locate that spot before you start typing.
{ } ), of ...calculateAreaOfPizza(), which is inside ...<script type="text/javascript"> element, which is inside ...<head> element. So, here's what to type:
// get the objects representing the elements we are working with
 var diameterElem = window.document.getElementById("diameter");
 var areaElem = window.document.getElementById("area");

 // get the value out of the input element
 var diameter = parseFloat(diameterElem.value);

 // calculate the result
 var area = areaOfPizza(diameter);

 // store result back into form
 areaElem.value = area;
Once you put this in, there is still one remaining problem—we still have not "pulled in" the areaOfPizza.js file. So, we should get this error:

So, we'll take care of that in the next step.
areaOfPizza.js So, now, to pull in the areaOfPizza.js file, we need to add one more line into our head element. Put this just before, the open tag for the <script type="text/javascript"> element you already have in the <head> element, as shown here (the new line is shown in bold).
<script type="text/javascript" src="areaOfPizza.js"></script>
<script type="text/javascript">
...
Once you do this, and refresh the page, the error should go away—instead, when you click on the calculate button, the calculation should happen! This is true as long as:
areaOfPizza.js in the same directory with your pizzaCalc.html file, andTo check that, visit http://copland.udel.edu/~youruserid/cisc103/lab08/areaOfPizza.js (substituting your userid!) and see if you can see the areaOfPizza.js file.
The only other thing that might have gone wrong is this:
So at this point, if it isn't working, do this:
If it is working, you can go to the next, and final step
To test the finished product, try these examples, which are from the lab06 instructions:
| If the diameter is this: | The area should be approximately: |
|---|---|
| 12 | 113.10 |
| 16 | 201.06 |
There is nothing to submit on WebCT—we'll just look at your work on the web.
In step 2b, the following text appears:
Use the <!DOCTYPE ... > declaration and <meta http-equiv="Content-Type" ... > tags that you used in lab07, so that the page can be validated at http://validator.w3.org
However, if you try to validate with that <!DOCTYPE ...>, you'll get several validation errors including:
To fix these problems, we'll need to do all of the following
Because we are using self-closing tags, we need to move to the DOCTYPE for XHTML 1.0 strict if we want our document to validate properly. (You can read about the differences between HTML and XHTML in Chapter of your Head First HTML with XHTML and CSS textbook.)
So, change the DOCTYPE to this one:
<!DOCTYPE html
     PUBLIC "-//W3C//DTD XHTML 1.0 Strict//EN"
    "http://www.w3.org/TR/xhtml1/DTD/xhtml1-strict.dtd">
Typically you "copy and paste" this section—I will not expect you to memorize it.
When using XHTML instead of HTML, the <html> open tag takes a slightly more complex form, with three additional attributes:
<html xmlns="http://www.w3.org/1999/xhtml" xml:lang="en" lang="en">
Here's a brief explanation:
xmlns attribute on this tag tells us what XML Namespace (xmlns) is being used—i.e. how to interpret the rest of the tags in the document.
xml:lang and lang tags tell us that this page is written in English (en). This may help with things such as search engine optimization (SEO).Typically, you just "copy and paste" this line—I will not expect you to memorize it for an exam.
Now, visit the page http://validator.w3.org
Enter the URL of your new pizzaCalc.html page—now updated for XHTML 1.0 strict—and click to validate the page.
You will likely run into at least one validation error (shown below) —possibly more. If there are any validation errors, fix them—20 pts of this week's lab grade is having no validation errors.
The one validation error you are almost guaranteed to have is this one:
<form> tag, required attribute action not specifiedHere's why, and how to fix it.
<form> open tag requires an attribute called action. action attribute is only used with server-side technologies such as PHP<form> with <form action=""> , and this problem should go awayIf there are other validation errors, use your knowledge of HTML to try to resolve them
Usually they are caused by simple things such as:
If you run across any problem that, after really looking at it carefully, you can't fix, you can bring it to your TA or instructor during lab, or office hours—or just wait for lab09.
| step | what we're looking for | points |
|---|---|---|
| step2b |
|
5 |
| step2b |
|
15 |
| step2b |
|
10 |
| step2e |
|
15 |
| step2f |
|
10 |
| step2g |
|
10 |
| step2h |
|
15 |
| overall following of directions | student should follow good style, following examples from the textbook, and from previous sample code from labs and lectures |
10 |
| overall following of directions | student should follow the directions given | 10 |
| Total |