By the time you complete this lab, you should be able to:
pwd, mkdir, and cd commands.You will also get more practice with
You'll do a few housekeeping items at the http://www.udel.edu/network prompt also:
/bin/tcsh or /bin/bash instead of /bin/csh.
Our first step this week is to take care of three basic housekeeping items related to your Unix account:
/bin/tcsh or /bin/bash instead of /bin/csh. On the SunRays, bring up a web browser. (You should have learned how to do that in lab01. If you are not sure, return to the instructions for lab01.)
Now, access the web page: http://www.udel.edu/network. On that page, type in your UDelNet username and password.
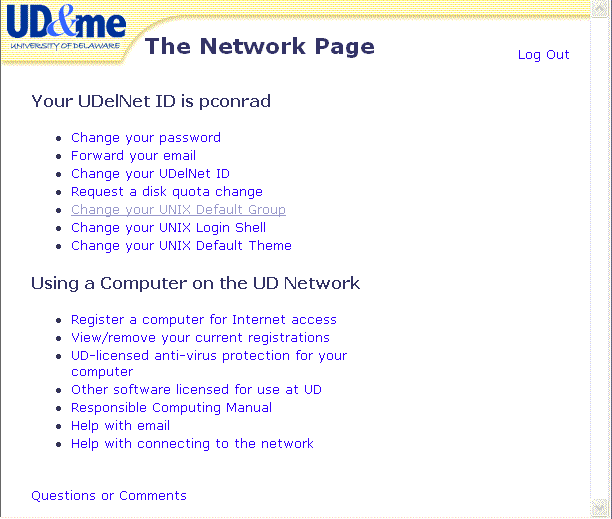
You should see a screen that looks something like the following.
Click where it says "Change your Unix Default Group". That should take you to the following screen:
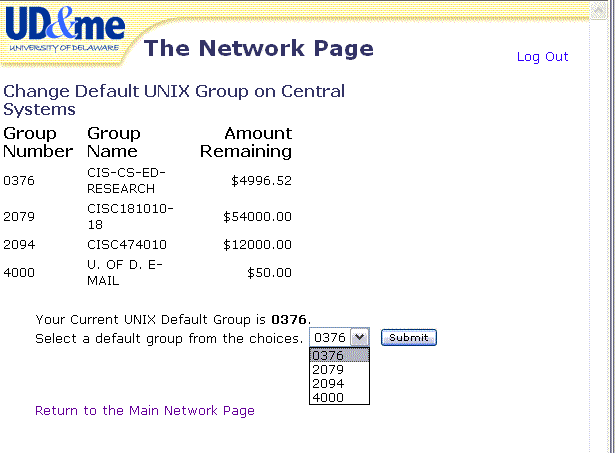
On the example screen above, one of the items on this page is listed as CISC181010-18, which means CISC181, sections 010 through 018.
On your screen you should see several groups, one of which is a group for CISC103. Change your default group either to that one, or whichever one has the most money in it.
In the drop down box shown, select the group, and click submit. You are now done with this step, which you should only have to do once per semester. However, there is still some important stuff to read.
Hopefully the dollar amount listed for CISC103 will be something like $300 for you (in my case, it is $54,000, which is the total for everyone in the course.) We'll talk about the "money" in a minute; for now, just know this: it's not real money. It's just pretend money used to track computer usage. You wont get a bill for it. Ever.
Let's come back to that $54,000. Because this example is from the instructor account, the "dollar amount" is huge. Your dollar amount as a student will be much smaller, but that's ok. The dollar amount will go down throughout the semester as you use strauss. It should not get below $50. If it does, contact your instructor immediately: he/she can request more "dollars" for your account. You can track your dollar amounts remaining by typing "chdgrp" when you are logged into strauss.
Now we need to change your default login shell. Click where it says "return to the main page". Then click on the option for "Change your Unix Login Shell". That should take you to the following screen:
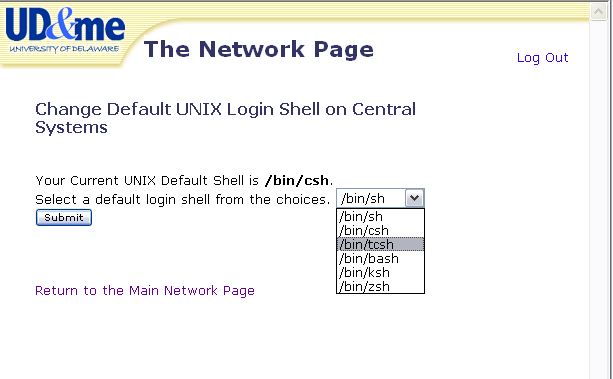
If your current Unix Default shell is csh, you should change it to tcsh by selecting /bin/tcsh from the drop down box, and clicking submit. You can then logout of the UDel Network page. This gives you command line editing (the ability to recall commands with the up and down arrows), as well as nifty things like file name completion (all of which your instructor will demonstrate in lecture.)
If your current Unix Default shell is tcsh, you don't need to do anything; you can log out of the UDel network page.
If your current Unix Default shell is bash, then you are probably already a confirmed "bash" user. The following paragraph is for you. Everyone else can ignore it.
Prof. Conrad writes: is is my intention to eventually migrate this course to "bash" rather that "tcsh". I acknowledge that "bash" is a better shell to teach.
That being said, you might be better off using tcsh for the time being. The reason has to do with the "path" variable you need to get to the compilers. We've tested the commands to access them from tcsh, but not yet from bash. So consider switching your default login shell to tcsh, or "typing in" tcsh after you login to strauss each time. The remainder of this lab, and all further labs (until future notice) will assume tcsh. Until I figure out the new environment as it relates to bash, if you use bash (or any other shell other than tcsh), and your commands don't work, you are on your own to fix it.
If your current Unix Default shell is anything else, then read the paragraph above about bash, because it applies to you as well. Please considering switching to tcsh for the time being.
Next, go to the main menu of http://www.udel.edu/network again, and select "Request a Disk Quota Change".
The screen that comes up next should look something like this. What you should do is request the maximum quota increase for which you are eligible. You want to request an increase that will get you up to the number listed under "Max allowed without IT Approval.". This number will vary from student to student, from semester to semester. In the past, it has been as small as 10, and as large as 200.
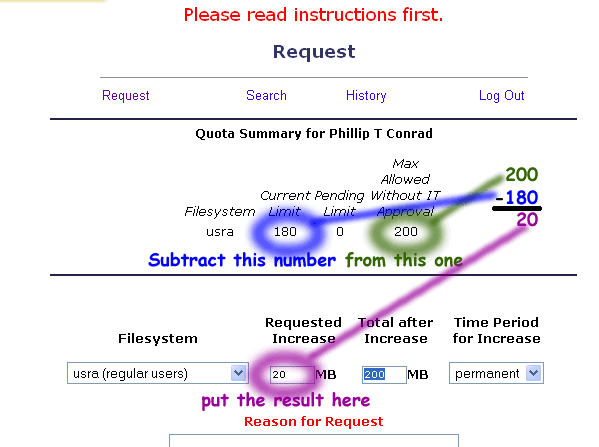
A "reason for request" is generally not required unless you exceed the amount that doesn't require IT approval (requesting more beyond this amount is not recommended unless you have a very good reason that does not relate to this course.) But if you want to put in a reason (or if the form is changed in the future to require it) just type in CISC105 or CISC103.
Once you've made the change to your quota, you can log out of the http://www.udel.edu/network screen.
Note that all three of the changes you made above on the http://www.udel.edu/network screen take overnight to take effect. But no worries—you can continue immediately with the rest of the lab anyway.
The instructions are the same as for lab02, step1. Please consult that lab for details
Either way, you should get the Unix prompt, which may look like any of the following, or even something different.
>
%
copland.udel.edu%
You know you are at the Unix prompt on copland if you type hostname, and the response is copland.udel.edu— like this:
> hostname
copland.udel.edu
>
During your time at UD, you'll likely end up using your UD Unix account for many classes—not just CISC103. So it is important to keep your files well organized. One of the first steps is to create a directory for those files. In the Unix operating system, a directory is what you may be accustomed to calling a folder under Windows or MacOS—it is a place to store a collection of files, and it has a name.
We are going to create a directory called cisc103 (note the lowercase "cisc"). This directory will be stored inside our home directory, which is the top level directory for all the information we store on the UD Unix systems.
When you first login, you always start in your home directory—that is, your working directory—the folder you are working in at the moment—is your home directory.
If you type the Unix command pwd, it will print your current working directory.
pwd stands for print working directoryTry it. You should get output similar to (but not identical to that shown below). The one shown in the example below is Phill Conrad's home directory (/home/usra/d9/55560). Yours will be different from that, but still in a similar format:
> pwd
/home/usra/d9/55560
>
Figure out what your home directory is, and make a note of it.
To do this, type the following three commands in the MATLAB command window. Note the use of lowercase—in general don't use capital letters in MATLAB except when the instructions specifically indicate to do so! (An explanation of each command follows the example input/output)
> mkdir -p ~/cisc103
> cd ~/cisc103
> pwd
/home/usra/d9/55560/cisc103
>
mkdir -p ~/cisc103, makes a new subdirectory (folder) called cisc103. This is the folder where you will store all of your labs for this semester.
~ stands for home directory. In this case, it is optional, since you are already in your home directory—so if you just typed mkdir -p cisc103, the effect would be the same. -p means "create this folder if it doesn't already exist". It is optional but prevents error messages from being displayed in the case where the directory already exists. mkdir commands with long paths such as mkdir -p ~/cisc103/lab07/jsFiles, the -p will create all of the folders on the entire path—or at least any that don't already exist. cd ~/cisc103, changes your current directory to be ~/cisc103—that is, the cisc103 folder under your home directory. pwd, asks Unix to print the working directory. Note that the working directory is now your home directory with cisc103 stuck on the end of it.Now that we have a directory called cisc103 under your home directory, each week we will make a separate directory for that weeks lab. We'll call these directories lab04, lab03, lab04, and so forth.
In general, the squiggle (~), which is more properly called the tilde, stands for your home directory.
So, to
you can use the following sequence of commands:
> mkdir ~/cisc103/lab04
> cd ~/cisc103/lab04
> pwd
/home/usra/d9/55560/cisc103/lab04
>
lab04 directory under cisc103. cd .. (that's cd dot dot).cd ~ (that's cd squiggle) In general, the squiggle (~), which is more properly called the "tilde", stands for your home directory.
cd ~ that means "change directory to my home directory"cd ~/cisc103 it means "change directory to the cisc103 that is immediately under my home directory"cd ~/cisc103/lab04 it means "go into lab04, which is inside cisc103, which is inside my home directory"Try each of these commands. Also try cd .. after each command to see where you end up. Do this until you are comfortable with what the ~ and .. mean.
We'll use the Unix cp command to copy the files at the Unix prompt. Remember the "space dot" at the end of the command that signifies that you are copying files into the "current directory".
copland.udel.edu% cp /www/htdocs/CIS/103/pconrad/07F/labs/lab04/* .
After typing this command, do an ls command to see the new files you copied into your directory. They should match the files listed at the web link lab04 under the labs directory for this semester.
During lecture, you've seen demonstrations of how to edit files with emacs. Emacs gives you the ability to edit files directly on the server, avoiding the extra step of having to copy the files with a file transfer program.
Later steps in this lab—and later labs—will require you to be able to edit files with emacs. So, this step of lab04 gives you the opportunity to try that out for yourself on a practice file.
First, make sure you are in your ~/cisc103/lab04 directory:
copland.udel.edu% pwd
/home/usra/d9/55560/cisc103/lab04
copland.udel.edu%
If not, then use the cd command to move yourself into that directory
copland.udel.edu% cd ~/cisc103/lab04
copland.udel.edu% pwd
/home/usra/d9/55560/cisc103/lab04
copland.udel.edu%
Note that this directory is not under your public_html directory, so it is not visible on the web.
Next, choose a filename. For example,
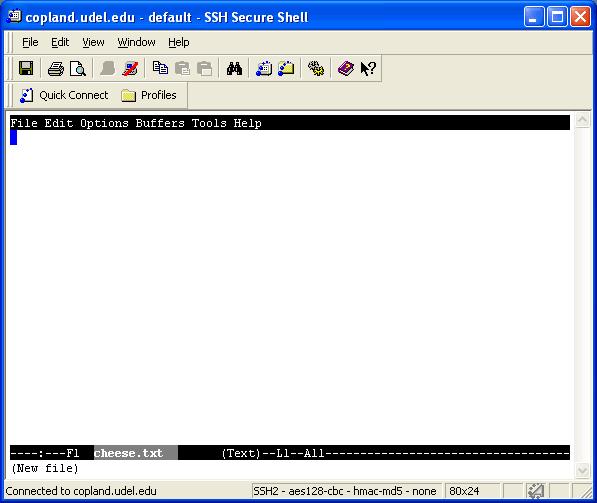
cheese.txtcars.txtactors.txtSuppose you choose cheese.txt. At the Unix prompt, type: emacs cheese.txt
copland.udel.edu% emacs cheese.txt
This should open up into a screen like this one:
cheese.txt, try entering cheddary for yes or n for no. Enter several examples of whatever your file is called—e.g. if you selected cars.txt, enter Mazda, Jeep, Toyota, Ford, Chrysler, Buick, etc. each on one line. This is just for practice, so you can really enter anything you like.
When you are done, save your file, and type, for example more cars.txt at the Unix prompt. You should see the contents of your file. Then type emacs cars.txt again to go back and make more changes. Do this until you are comfortable that you know how to use emacs to make changes to files.
Don't freak out. Emacs can take a little getting used to. There can be a temptation to just give up and say "I'll just use Notepad and transfer the files".
Trust me though—once you get used to it, it is so much more convenient than editing and copying, especially when you have to make several small changes and immediately see the effect on the server. Ask your TA for help—with a little guidance, you can get past the initial bumps, and become an emacs whiz!
Sometimes when you hit the backspace key, you hope that it is going to erase the previous character. Instead, what happens is that the screen goes all funny like this:
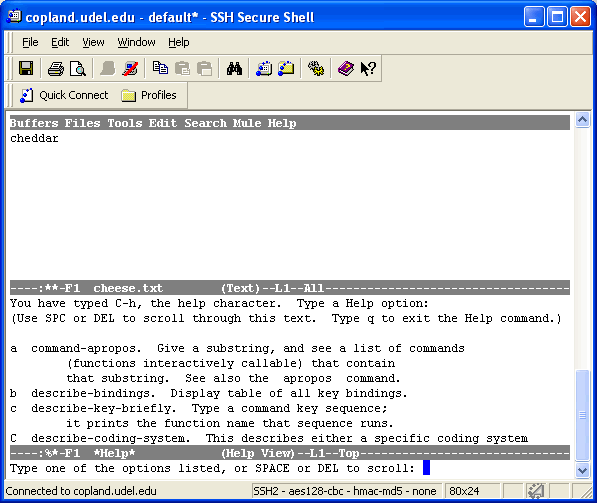
CTRL/G (hold down CTRL key and type G) is the magic spell in emacs that Gets you out of trouble. Say it out loud a few times to help you remember—with an emphasis on the G sound in Get:
After you type CTRL/G, you should be back to the regular screen. Then, instead of the backspace key, try the delete key. That might do what you want.
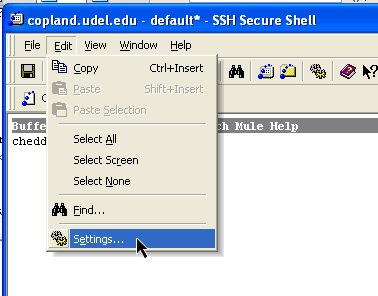
If you are using SSH Secure Shell on Windows (the one from http://udeploy.udel.edu), you may want to go to the menu "Edit Preferences".
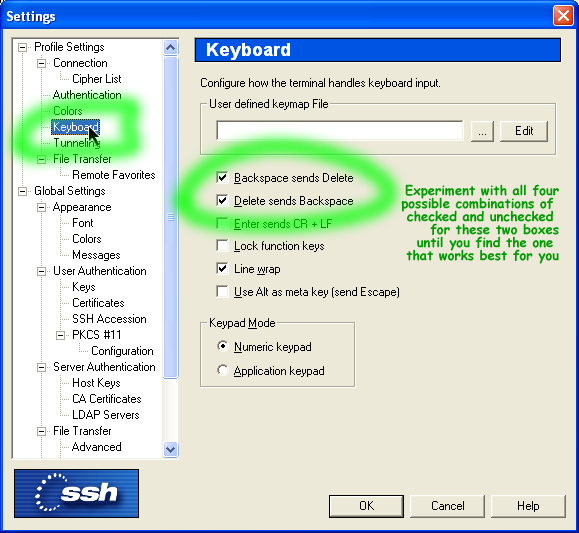
Under this menu, go to Keyboard, as shown here. Find the settings for "Backspace sends Delete" and "Delete sends Backspace". Experiment with all four possible settings of checked and unchecked for these two boxes until you find what works best for you.
The following file contains more information on emacs. Take a look at it to see what it contains. You may want to bookmark for later reference:
http://www.udel.edu/webct/students/assignments.html
Nothing from Step 6 is for a grade —it is only for practice. In step 7, you'll use emacs to edit a web page for a grade.
Now, to get more practice with creating web pages, and with using emacs, you'll create an HTML file directly on the server using emacs.
For each lab, there are two possible places you might be creating files, and it very important to understand the difference. We'll use lab04 as an example:
~/public_html/cisc103/lab04: Files created here go on the web—are and thus visible to everyone in the world that has an internet connection and a web browser~/cisc103/lab04—Files created here are private. Not even your instructor and TA can see them. Files you create here have to be submitted via WebCT if you want your TA and instructor to be able to give you a grade for them. We maintain these two different directories (folders) because sometimes you'll be working on the same problem as other folks in the class. In those cases, we want each of you to do your own work. If you can see the files of your fellow students, and they can see yours, it may create a temptation for some folks to copy work from one another.
Of course, it is a violation of academic honesty to submit someone else's work as your own. So, by keeping some work private, we reduce the temptation for those other folks—who unlike you, might give into that temptation. We also protect you, the honest student from having her/his work swiped by some other less ethical person. When you submit via WebCT, only your instructor and TA can see your submissions.
So, when we work on web pages, we typically give each of you a different problem to solve so that you each student has to do his/her own work, even though the work is publicly available.
Publicly available web pages for lab04 go in ~/public_html/cisc103/lab04 and are visible at http://copland.udel.edu/~yourusername/cisc103/lab04
(remember to substitute your own username in place of yourusername .)
When we work on JavaScript programming, sometimes everyone is working on the same problem. In those cases, we'll work in the private directory ~/cisc103/lab04, and the work is secure. You submit it via WebCT.
To get the best grades in the course, be sure that you have all your files in the right place. Having files in the wrong directory can result in deductions from your lab grade.
If you are not sure, ask your TA during lab, and she/he will help you determine if everything is in the right place. If not, he/she can help you through the Unix command needed to put things where they go.
Now, create the directory ~/public_html/cisc103/lab04 and move into it with the following sequence of Unix commands:
copland.udel.edu% mkdir -p ~/public_html/cisc103/lab04
copland.udel.edu% cd ~/public_html/cisc103/lab04
copland.udel.edu% pwd
/home/usra/d5/55560/public_html/cisc103/lab04
copland.udel.edu%
Use emacs to create the file lab04.html—the command is emacs lab04.html
Inside this file, put:
cisc103 lab04, by Pat Jones nested inside the head element
Pat Jones Pat Jones's lab04 for cisc103 at the top of your body element Last Updated 09/18/2007 (substitute today's date in place of 09/18/2007).When you are done, save the file (CTRL/X CTRL/C then y).
Note: to save time and space, we usually abbreviate CTRL/X CTRL/C this way: ^X^C. I'll use that style of abbreviation from here on.
Next, use this Unix command to make this file readable on the web:
copland.udel.edu% chmod -R 755 ~/public_html
copland.udel.edu%
To be honest, the chmod -R 755 ~/public_html command is "overkill"—it makes everything under your ~/public_html folder readable. Here are a few other approaches.
If you had previously made your ~/public_html folder and ~/public_html/cisc103 folders readable, it may have been sufficient to do the following command, which only affects the lab04 folder under ~/public_html/cisc103, and everything underneath it.
copland.udel.edu% chmod -R 755 ~/public_html/cisc103/lab04
copland.udel.edu%
Another approach is this one—it uses pwd to first check if you are under your public_html folder. Then, it uses the . which means "current directory". The command chmod -R 755 . makes everything under the current directory readable on the web.
copland.udel.edu% pwd
~/public_html/cisc103/lab04
copland.udel.edu% chmod -R 755 .
copland.udel.edu%
Next, visit http://copland.udel.edu/~yourusername/cisc103/lab04
You should see a link for your lab04.html file. Click on it and make sure your content is correct.
If not, then go back and do emacs lab04.html again. Repeat steps 7c, 7d, and 7e until the file looks correct.
This step is modeled after what we did in lecture on 09/13, as described on the wiki page FireworksJavaScriptExample.
Just follow the instructions on that wiki page.
When you are finished, we should be able to go to
http://copland.udel.edu/~youruserid/cisc103/lab04/fireworks.shtml
(remember to change youruserid to your UD username)
and see a version of your lab03 file with fireworks on it.
In lab2, to bring up command line JavaScript, we had to type /www/htdocs/CIS/103/pconrad/bin/js every time we wanted to go in to JavaScript. Typing that can get sort of annoying.
In this step, we will add an alias into a file called ~/.localalias so that we can bring up command line JavaScript just by typing js at the Unix prompt.
Here's how:
cd by itself at the Unix prompt to return to your home directorypwd to ensure that you are in your home directory (e.g. something like /home/usra/d9/55560)emacs .localalias being very sure to .localalias with a dot, spell it correctly, and use all lowercase. alias js /www/htdocs/CIS/103/pconrad/bin/js
js at the Unix prompt. It should then give you the JavaScript prompt (js>) as shown below. Type quit() to get back to the Unix prompt.
copland.udel.edu% js
js> quit()
copland.udel.edu%
If it doesn't work, the troubleshooting procedure below may fix things—so far it has worked in at least one case where the student was doing everything right, and it just wasn't working out. The problem ended up being with how his account was set up, and this sequence of commands made everything right.
Depending on when you first matriculated at UD—matriculate is just a fancy word for "joined the University as a student"—your setup files might not have the proper settings to use a .localalias file. The reason is that over the years, they've set up incoming students Unix accounts with slightly different initial settings.
Here's how you can reset your account to the correct current settings:
At the Unix prompt, run this command, which will reset some of the files that contain the settings for your unix account (some line of text should appear on the screen telling you what it's doing)
copland.udel.edu% ~consult/proto/setup
.localalias looks different now, or is now an empty file.localalias.js and see if it works.If after trying this, it still doesn't work, consult your TA and/or instructor for additional help.
In the meantime, you can continue with the rest of the lab—you'll just need to type the full command to get into JavaScript, namely /www/htdocs/CIS/103/pconrad/bin/js instead of js. Clearly the latter is more convenient, but other than that, there is no difference.
Back at step 5 you copied several files into your the directory ~/cisc103/lab04. One of these was the file dayOfWeek.js.
Use the command cd ~/cisc103/lab04 to put yourself in this directory. Then use the pwd command to verify that you are then, and the ls command to ensure that you have this file in that directory:
copland.udel.edu% cd ~/cisc103/lab04
copland.udel.edu% pwd
/home/usra/d9/55560/cisc103/lab04
copland.udel.edu% ls
dayOfWeek.js
copland.udel.edu%
If this doesn't work, or you get an error, try step 5 again, and/or ask your TA for help.
Next, use the js alias that you created in step 9 to access the JavaScript prompt:
copland.udel.edu% js
js >
If this doesn't work, try step 9 again, and/or ask your TA for help.
If it does, then we are ready to try loading a function definition into JavaScript.
Suppose we want to put up different content on a web page depending on the day of the week. We need a way to calculated what day of the week it is. JavaScript can allow us to determine the current Date by simply typing new Date at the JavaScript prompt. Try it:
 js> new Date
 Tue Sep 18 2007 14:07:08 GMT-0400 (EDT)
 js>
This is good and all, but it isn't really formatted the way we want it to be. However, inside the file dayOfWeek.js, there is some JavaScript code that defines a new function called dayOfWeek(). If we just type dayOfWeek() at the JavaScript prompt right now, we get an error (try it)
js> dayOfWeek()
1: ReferenceError: dayOfWeek is not defined
js>
But, if we load the contents of dayOfWeek.js into JavaScript, then we can use the dayOfWeek() function to display today's date. Try it:
load("dayOfWeek.js"); at the JavaScript promptdayOfWeek() again. Your output should be similar to the following output:
js> load("dayOfWeek.js");
js> dayOfWeek()
Tuesday
js>
We will build on these ideas in future labs—showing how you can define your own functions, and then use them in the construction of web pages. All of the code that makes the fireworks happen on the web page you created back at step 8 is written just in this way. This will be an interesting an fun exploration over the coming weeks.
Type quit() at the js> prompt to exit the JavaScript command line.
Now, refer back to step 4 of lab02 for a reminder about the script command. Re-read that part of lab02 now. Then continue with the steps below.
You will next use the script command to create a script called lab04.txt.
script lab04.txtScript started, file is lab04.txt, a new Unix prompt will appear. This prompt may be different from the old one.pwd to show your current working directory js to go into the JavaScript command line. lab04.txt exit to stop the script, and then type more lab04.txt to be sure your script contains the correct content. copland.udel.edu% script lab04.txt Script started, file is lab04.txt % pwd /home/usra/d9/55560/cisc103/lab04 % js js> new Date
... etc
Continue with Step 10 work, ending with quit() command ...
js> quit() % exit exit Script done, file is lab04.txt copland.udel.edu% more lab04.txt Script started on Tue Sep 18 14:15:33 2007
%js
js>
...
Once you have finished this step, you are ready to submit your work on WebCT
To submit your work on WebCT, you will need to transfer the file lab04.txt to your hard drive first.
The instructions for uploading to WebCT can be found at step 6 of lab02.html—refer back to that file if you need a refresher.
| step | what we're looking for | points |
|---|---|---|
| step1 | TA will use finger command to check that student's shell is /bin/tcsh or /bin/bash | 5 |
| step7 | TA will check for web page http://copland.udel.edu/~username/cisc103/lab04/lab04.html. File exists and is readable on web? (5 pts) File named correctly? (5 pts) File has correct content (25 pts) |
30 |
| step 8 | TA will check for web page http://copland.udel.edu/~username/cisc103/lab04/fireworks.html. File exists and is readable on web? (5 pts) File named correctly? (5 pts) File has correct content (25 pts) |
30 |
| step 10-12 | TA will check WebCT for submission |
30 |
| overall following of directions | student should submit all work according to directions given | 5 |
| Total |