
Running SAS interactively using the SAS Display Manager System (DMS)
The SAS DMS is not available unless you are running software that supports full graphical UNIX X applications. These include the UNIX Sun Ray machines, a Windows machine running Xming or Cygwin, or a MAC running OS X.
To access strauss with a full-screen interface from a Windows machine using secure shell:
- Set the secure-shell terminal to
support "tunneling." From the Edit
menu, click Settings then click
Tunneling. Be sure the box titled
"Tunnel X11 connections" at the bottom
left of the right frame is checked:
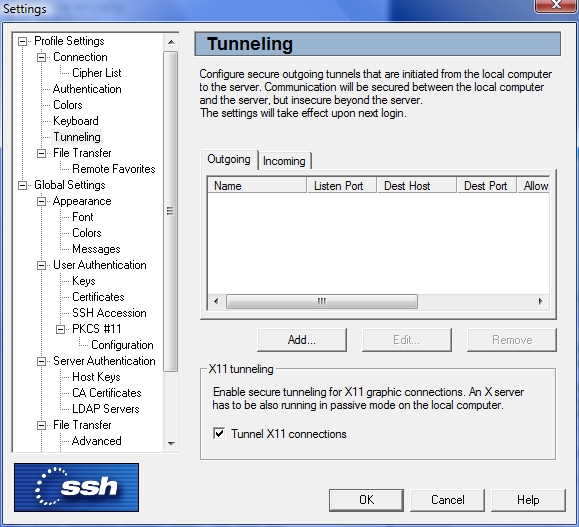
If "Tunnel X11 connections" is not already checked, click it, click OK, and close secure shell.
- Start one of the clients: Xming or
Cygwin.
- Start secure shell again and log on to strauss (Quick Connect). Use the secure-shell terminal applcation (generally the icon with the white rather than the yellow background).
If secure shell is already set to support tunneling, you need just the last two steps.
Note: Xming and Cygwin are open-source software. You can install them free of charge on your personal computer.
On a Sun Ray, you may start SAS with mouse clicks. From the Applications menu, click Other then click SAS System. You may also start SAS from a command prompt in an xterm window open on strauss.
On a Sun Ray, you may open an xterm window on strauss from the Applications menu. Click Internet then click xterm on Strauss. On Mac running OS X, log on to strauss. On a Windows machine, start Xming or Cygwin and log on to strauss with secure shell. With a connection from Windows, you may start SAS from the secure-shell command prompt or from an xterm window.
To start SAS with a command, from a strauss command prompt, type:
sasWith this command, your terminal window is "frozen" until you exit SAS. To run interactive SAS and free your terminal window for typing UNIX commands, add an ampersand after the SAS command:
sas &When you start SAS with the Display Manager System, several windows appear. They look something like Figure 1, which is slightly modified to show all the windows.
 Figure 1 |
As shown in Figure 1, three primary windows plus the Toolbox are visible. The three primary windows are:
- SAS: Explorer—window for easy
access to SAS libraries and files.
- SAS: Log—window for
displaying annotated program
statements, including diagnostics, for
each submission of a program run.
- SAS: Program Editor—the SAS text editor for composing SAS programming statements.
The SAS ToolBox is the narrow window at the bottom of the figure. It can be used for quick access to several operations using the mouse, and DMS commands may be typed in the dialog box. For instance, type
endsasto exit SAS quickly with no dialogs. But be careful: you are not prompted to save any files.
Additionally, two windows are hidden from view in Figure 1:
- SAS: Output—window for
displaying output from SAS procedures
and any output generated by program
statements, hidden behind the "SAS:
Log" window.
- SAS: Results—frame for negotiating through the output window, hidden behind the Explorer window
Use the mouse to move and resize these windows. Each window is independent of the others and may be moved and resized to suit your preferences.
To obtain a spreadsheet window with limited data analysis capability, from the Solutions menu, click Analysis then click Analyst. The quickest way to get to the Analyst window is to type
analyst in the ToolBox. The resulting window looks like Figure 2.
 Figure 2. |
To bring in a file for analysis, click the File button. To open a file by its sas name (libref.name), click Open By SAS Name.
Note: If you run a binary logistic regression using the Statistics menu, select the value of the the dependent variable that you are modeling. Use the dialog box under Model PR{ }: at the top right of the Logistic Regression dialog box. The reference category is the value not selected. Generally, select 1; the default is 0 which reverses the sign expected by most analysts.
To run the Windows version of SAS in the RDMS Lab, click Start at the bottom left of the screen, select Programs then SAS v9.
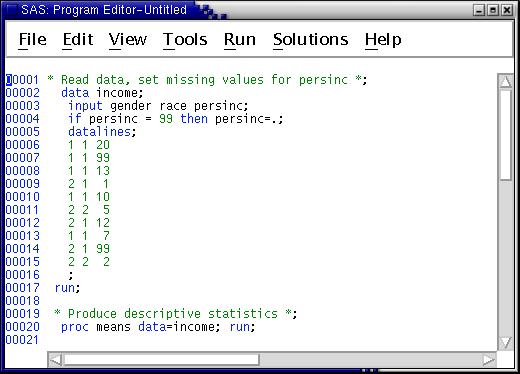
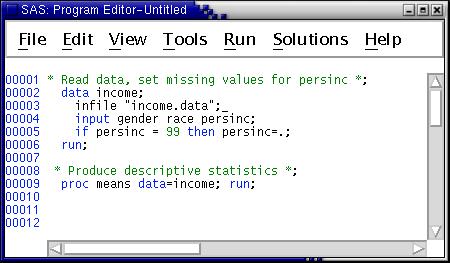
Example 1: Including data with the commands in the Program Editor
If you have a small amount of data, it sometimes is convenient to include it with your commands in the Program Editor. This example shows how to read data from the Program Editor and produce descriptive statistics. Note that the commands beginning with an asterisk (*) [and ending with a semicolon (;)] are comments. The complete program is:
To submit the program, from the Run menu, click Submit or press the F3 key. Your program code disappears from the Program Editor. To retreive it, from the Run menu, click Recall Last Submit or press the F4< key.
An annotated version of your program code is written into the SAS Log window. The Log window also contains notes, warnings and error messages. Output from procedures is written to the Output window. You can activate these windows by clicking them or from the View menu, clicking the window you wish to activate.
For a small amount of output like that produced by this program, go straight to the Output window to view it. When you produce a large quantity of output, you may want to use the Results Window to navigate through it. The Results Window looks like:
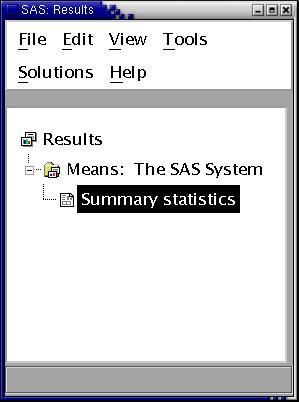
Open each section marked by +, then right-click the ouput you wish to veiw and release on Open.
Example 2: Reading data from an external file
Usually it is more convenient to store data in an external text file and use an infile statement to identify the data to SAS. A program illustrating how to do this is:
The datalines statement, data and trailing semicolon (;) are replaced by the infile statement.
Using the Program Editor
Editing with the SAS Program Editor requires use of the prefix area to delete and insert lines. For example, to delete the datalines statement, the data, and the trailing semicolon from the first example, place DD in the prefix area beside the first and last lines to be deleted.

When you press ENTER, the lines are deleted. To insert a line, place an i beside the line before which you want the new line. When you press ENTER, a new line opens just below the line where you placed the i. Other useful line codes include c (copy one line), cc (copy a block of lines enclosed by cc), b (paste the copied line(s) before the current line, a(paste the copied line(s) after the current line.
