What is a Camera RAW Image,
and how is it Different From JPEG Camera Images?
Digital cameras have a number of ways to take and store images. Depending on the camera, you can choose to save your images as a JPEG file with various compression settings, as a TIFF file, or—as many more manufacturers offer this option—as a RAW file.
| What is Camera RAW? | What is a Camera JPEG? | What Are the Advantages of RAW Files? |
| What Are the Advantages of JPEG Files? | RAW Gotchas! | How Do I Develop My RAW Images? | How Do I Save RAW Files For Use in My Image Editor? | Examples |
What is Camera RAW?
Raw files are 16 bit images, having 4096 tones per color channel, thereby producing over 68 billion colors. RAW files contain the maximum amount of data possible by capturing exactly what the sensor recorded when the shutter was pressed; therefore, RAW files hold more useable data than do files in JPEG, TIFF, or other formats.
It is helpful to think of each RAW file as if it were a piece of undeveloped digital film.
RAW images will need to be developed (i.e. setting white balance, color temperature, correcting shadows & highlights, etc.) before further manipulation (i.e. removing blemishes, cloning etc.) in your image editor. This allows you to have greater control over the appearance of your final image.
What is a Camera JPEG?
Saving an image as a 16-bit RAW file overrides the camera’s compression settings, allowing you to save an image that might otherwise have been distorted by the camera’s compressing the image into an 8-bit JPEG. For instance, if the JPEG camera settings lead to “blown out” highlights (containing no, or very little, data in the highlights), then using 16-bit RAW can enable you to recover that information.
The camera's sensor determines the black and white points of the each camera's image. These values are the same for both for the JPEG and the RAW files. The difference between the two lies in the tonal range between these black and white points. RAW files have 68 billion colors between black and white; JPEG files can have no more than 16 million colors.
Having the extra tones can increase editing flexibility, especially when trying to preserve details in shadows and highlights or pulling out more detail in other areas of the image. The extra bit depth allows you to spread the colors over a greater range creating fewer opportunities for banding to occur.
The RAW file is developed in a nondestructive way by using a text file that contains your development instructions. Therefore, you can go back to the original RAW file and redevelop it any number of times without destroying the original image information.
What Are the Advantages of RAW Files?
Saving an image as a 16-bit RAW file overrides the camera’s compression settings, allowing you to save an image that might otherwise have been distorted by the camera’s compressing the image into an 8-bit JPEG. For instance, if the JPEG camera settings lead to “blown out” highlights (containing no, or very little, data in the highlights), then using 16-bit RAW can enable you to recover that information.
The camera's sensor determines the black and white points of the each camera's image. These values are the same for both for the JPEG and the RAW files. The difference between the two lies in the tonal range between these black and white points. RAW files have 68 billion colors between black and white; JPEG files can have no more than 16 million colors.
Having the extra tones can increase editing flexibility, especially when trying to preserve details in shadows and highlights or pulling out more detail in other areas of the image. The extra bit depth allows you to spread the colors over a greater range creating fewer opportunities for banding to occur.
The RAW file is developed in a nondestructive way by using a text file that contains your development instructions. Therefore, you can go back to the original RAW file and redevelop it any number of times without destroying the original image information.
What Are the Advantages of JPEG Files?
JPEG files can be taken into your image editor or used right out of the camera: No developing is necessary. The JPEG format has been standardized for many years, so most image editors open JPEG files without conversion.
JPEG files are smaller than RAW or TIFF files, which allows you to store more photos on your card even when using the highest quality setting.
RAW = more control, more processing time, and more storage space
JPEG = less control, less processing time, and less storage space.
There is some good news for those who can’t decide which format to use. Many cameras allow you to shoot both formats at the same time. The cost of larger and faster memory cards have dropped dramatically, so shooting in both formats is an option most people can take advantage of.
RAW Gotchas!
It is important to remember that you will not be able to rescue an image, even one stored as a RAW file, if the camera settings caused the tones to be taken outside of the sensor’s range. If the image is underexposed or overexposed to the extent that the sensor does not capture data in the highlights or shadows, the RAW file will not contain information needed to pull out the highlights and lighter details.
Additionally, in underexposed images, image noise in the shadows and dark areas will be become more apparent as those areas are lightened.
Setting the proper white balance on your camera is also important. White balance settings are saved with the RAW file, and the file will open in most RAW editors with those settings applied. If you have to fix the white balance as part of the “developing,” you will add extra processing time.
While there is a sharpening feature in RAW software, it can only do so much to improve the sharpness of a poorly focused image. Make sure your shot is in focus before pressing the shutter release.
How Do I Develop My RAW Images?
You will need software to develop a RAW image. Most camera companies that offer the RAW format also supply their own RAW software on the CD accompanying the camera. There are many different RAW formats; the camera makers have not yet agreed upon a standard RAW format. Therefore, to process RAW files, you must use your camera’s software or use a third party package that supports your camera’s profile. (E.g., Adobe Camera RAW which comes with all CS versions of Photoshop, and Elements, as well as stand alone packages like Adobe’s Lightroom, Apple’s Aperture, and Phase One’s Capture One.) These programs often offer more control over the RAW developing process than the software supplied by the camera maker.
How Do I Save RAW Files For My Image Editor
After the image has been developed in your RAW processing software, and you’re ready to move it to your favorite image editor for further manipulation, it is best to save the file in a 16-bit TIFF format, or Adobe’s DNG (Digital Negative) format. These two file formats will allow you to continue editing the image without reducing image quality. If you are using one of the Adobe products to develop your RAW image, you will be given an option to open it directly in Photoshop or Elements from the Adobe RAW editor.
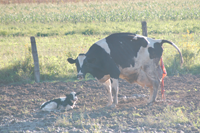
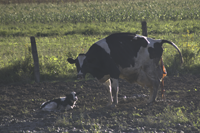
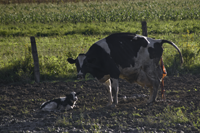
Some Examples
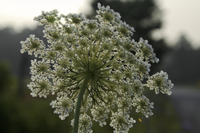
Here are two images each has been captured in JPEG and RAW formats. They an example of the difference between an image captured in JPEG and RAW formats. The third image is the RAW image opened in Adobe Lightroom with the image's default setting applied. The default settings are inherited from the camera's instructions imported into Lightroom with the RAW file. (Note: More fine-tuning of the image could have been applied, but the purpose of these two images is to demonstrate the basic differences between a JPEG and a RAW version of the same shot. The files have been saved to a web format (PNG) so some changes have occurred during that process. But the major differences should still be visible.) |
||
| This column contains the JPEG image straight from the camera. |
This column contains the RAW image opened in Lightroom no adjustments applied (i.e what the camera captured). |
This column contains the RAW image with default settings applied in Lightroom then opened and saved in Photoshop. |
|
|
|
 |
 |
 |