How To Set Scanner Settings
For Web Images
These are instructions for setting up and using two of the very old Recitation Computing site's color scanners. We no longer have these scanner, but the instructions are basically the same. All the same rules apply for scanning.
The HP scanner is equipped with a transparency top that enables you to scan regular hard copy, but also larger format film such as x-rays.
The scanning process is similar for all scanners. The scanner drivers you use may be different from ours and the scanning controls may be in different places. Consulting your scanner manual will help in locating your particular scanner control settings.
No matter what platform you use, the scanning process is the same for preparing all web images.
These instructions are for making an archival image, from which you will make your GIF and JPEG images. These archival images should be fine tuned and saved before the GIF or JPEG conversion process is applied. You will always want to work from your high quality archival image until you no longer need them, so keep them safe. For more information on the conversion process see the GIF Tutorial and GIF Images.
Setting Up The Nikon Scanner for Scanning images for WWW
- Open the Nikon Scanner software
(which in this computing site is located
in the Art programs folder on the hard drives.)
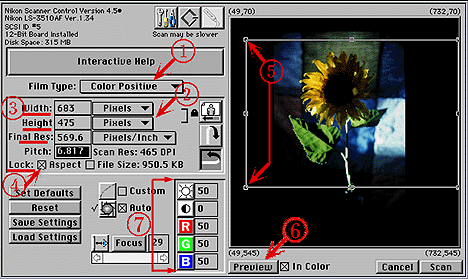
- The Nikon Scanner controls window opens (see fig. 1).
- Check Film Type (#1) if your film type is not chosen
select your film type from the pull down window
- Click on the Preview button (#6)
and a low resolution image appears
- Look at the LOCK (#4) option
If it is checked (x'ed) un-check by clicking on it,
If it is not x'ed fine leave it unchecked
- Select image to be scanned (#5) by dragging the selection handles around the part of the image you wish to included in your final scan
- Now click in the LOCK BOX (#4) so an x appears in it.
(This is letting the scanner know that you want these dimensions fixed in place)
- Change width and height measurement from inches to PIXELS (#2) ( if set to inches).
- Enter in Width and Height dimensions (#3) so that no one dimension is larger then 640 pixels for width or 480 pixels high.
Example: if your image is oddly shaped and you key in 640 for the width, but the height is still greater then 480, reduce the height dimension to 480.
- Change DPI to 300 (#3).
(You are now telling the scanner that the image you selected and locked into place is to be scanned within these constraints)
- Click on the SCAN BUTTON to scan your final image or adjust brightness/contrast/color options (#7).
NOTE adjusting the image is best done in Photoshop where you have more powerful controls and a larger image window.
- Save image : Saving in a TIFF format will give you greater flexibility when working with images across different platforms.

(FIG. 1) before proper setting have been made
Setting Up The Hp ScanJet IIcx Flatbed Scanner
for Scanning Images for WWW
- Open Deskscan II, located on the hard drive.
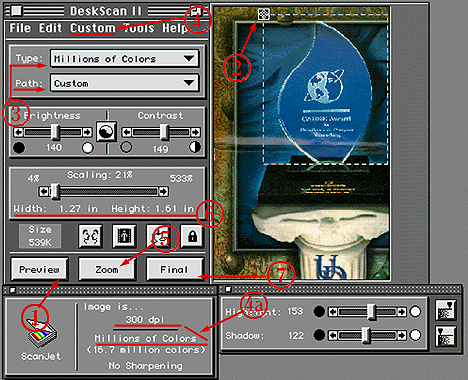
- Look at the settings (Fig. 2).
These are pull-down menus for selecting the appropriate settings for your image.
- Type = Millions of colors (#3)
(in most cases when scanning colors this is the best setting. Other options include, grayscale, line art, halftone)
- Path = Custom (#3)
- Print Path (under the custom menu bar item) = 300 dpi (#4)
(Check the image information window (#4a) to see how many colors are selected; it should be 16.7 million and the dpi
- Click on the Preview button (#1). A low resolution image will appear in the scanner window.
- Select image to be scanned (#2) by dragging the selection handles around the part of the image to be included.
- Click on the (#5) Zoom Button: to fine tune your selection
Setting the image size with slider bar
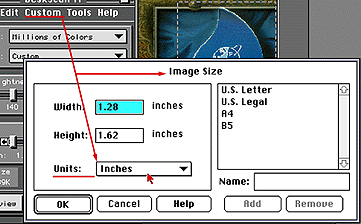
Here you will let the scanning software know that the image you selected will be scanned to the dimensions you set. See Figure 2a.
- Check the scaling option (#6)
under the brightness and contrast controls.
- If set to inches, change change scanning measurments to pixels in the Custom Menu (#4)
(found in the scanner controls window).
- Pull down to Image Size(Fig. 2a) the image size control window will appear.
- In the Units pop-up box, click the inches box and drag down to Choose Pixels.
You will also see your selection's height and width in this window. Leave these settings as they are.
- Click OK
- Move the Scaling Bar (#6) (by clicking and draging it) so the Width and Height Dimensions read no more then 480 pixels high or 640 wide.
Example: if your image is oddly shaped and you key in 640 for the width, but the height is still greater then 480, reduce the height dimension to 480.
- Click on the Final Button (#7) to Scan your image.
You will be asked to give your file a name.
- Open PhotoShop.
- Open your file in PhotoShop.
- make final adjustments and save.
Saving in a TIFF format will give you greater flexibility when working with images across different platforms.

(FIG. 2) before proper setting have been made

(FIG.2a) before proper setting have been made