In lab01, you learned how to create a basic .html file, and upload it on to the web server for student web pages at UD, namely copland.udel.edu.
In lab02, you learned how to make a basic web page, complete with headers, title, content, and some very basic CSS to give it style (e.g. choosing colors for the different levels of headers, etc.)
In lab03, you turned in this into a web site with at least three pages, and hyperlinks connecting those pages.
In this lab, you'll learn how to use Server Side Includes (SSI) to create a common header for all the pages on your site, to
In addition to learning about SSI, you'll also learn other new concepts:
<div> element<div id="navHeader"> ...#navHeaderI'm calling this "Step 0" for two reasons:
Note that you can get to this link from the main course web page by the following navigation:
 Main course web page
 ==> More Code Examples
     ==> HTML
         ==> ssi
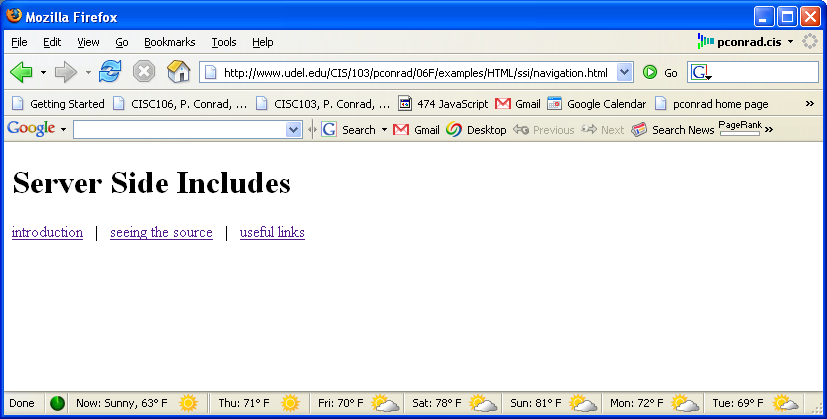
Once you are there, click on the file navigation.html and look at the contents. It should show up something like this:
Try it. The view source should show something like the following:
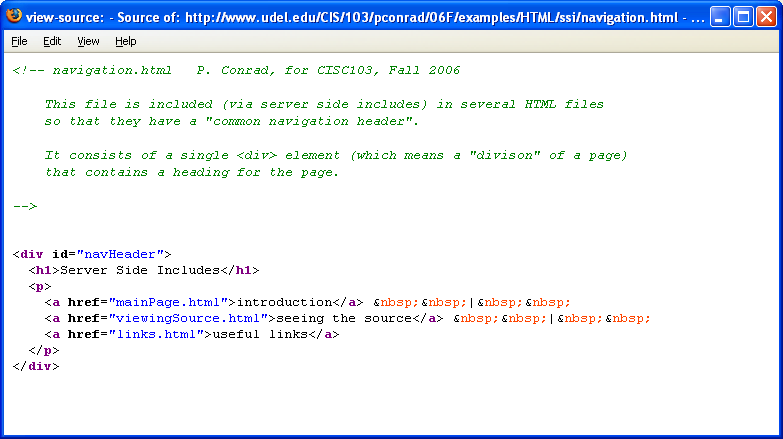
<html>, <head> or <body> open tag, for example. <!-- blah blah blah -->) followed by one element, a <div> element, with some content inside it.<div> element means "division", and it is used for a "division" of a larger web page.<div> element there is a header, and then a "paragraph" element of sorts, with three links in it.<div> is the block equivalent of the <span> element we've already seen in lecture. <span> is, or course, an inline element, since it is used in the middle of paragraphs and stuff. Click on any of the other three files in this directory, namely:
Note that each of them has a common header, and the header looks something like this:

In fact, this common header is produced by the code inside the file navigation.html. Do a view source on any or all of the three files:
You'll see that it looks like the file navigation.html has been "cut and pasted" into each of these three files.
In fact, what happened instead is that a "Server Side Include" was used.
Instead of cutting and pasting the contents of navigation.html into each of these files, I just put one line inside each of them:
<!--#include file="navigation.html"-->
That one line of code does a "cut and paste" into the files every time the file is downloaded from the server.
That way, if you make a change in navigation.html, it automatically gets made on all three of the web pages that "include" the contents of "navigation.html".
Spend some time to read over the content of the three pages and learn about SSI. Your task in this week's lab is to do something similar with your lab03 web site—that is, to add "common navigation" through a header at the top of each of your pages.
Note that the common header looks different when you look at it in its own browser window, vs. when you see it "included" in the other three pages.
That's because of the CSS style rule (the <style> element) inside each of those pages. Here's what that rule looks like:
 #navHeader { text-align:center;
               background-color: #ccccff;
	       font-family: sans-serif;
	       color: #ff3333;
               font-size: 80%;
	     }
It specifies that for an element with the attribute id="navHeader" (that's that the #navHeader part means), we should use a nice lavender background (#ccccff), a dark red color for the foreground (#ff3333), etc.
As the page notes, the fact that this CSS has to be repeated in three different HTML files is kind of lame. You might thing we'd use SSI to fix that problem too, but in fact there is a preferred solution—see p. 303-307 for information about that. Next week, we'll tackle that problem as well—or you can do it this week too if you feel ambitious, and get a little bit ahead of the game.
That's what the rest of this lab is all about.
Open up the SSH Secure File Transfer program, and use the "Quick Connect" button to access your account on copland.udel.edu
(If you are not sure how to do this, review the instructions from step 2 of lab02, and/or step2 of lab03. )
Create a subdirectory called lab04 on the hard drive of the system where you are working where you can make the files you'll be working with this week.
(Refer to step3 from lab03 if you need more detailed instructions)
We now are going to copy all of last week's files:
from your public_html/cisc103/lab03 folder on the copland.udel.edu server
to your new lab04 folder on the hard drive.
To do this:
lab04 folder.public_html/cisc103/lab03 folder, and you should see your index.html file, and the other two .html files you created last week. You may need to use the "up one level" button, shown below. ![]()
Follow the example, and make your own navigation.html file.
Test it out—you should be able to open it and follow the links to all three pages.
Notes:
index.html, just like it did in lab03.mainPage.html would definitely have the name index.html.
Add the following into all three of your other .html files pages, just after the opening <body> tag
<!--#include file="navigation.html"-->
Then, add a CSS rule to the style sheet on all three pages so that the element with navHeader id attribute looks nice, and has formatting that is consistent with the color scheme of your existing pages.
You can just add the rule into the existing <style> element on the pages you already have.
After I did the original version of the instructions, I realized that there is a difference between how SSIs work on the server www.udel.edu (where the example documents are hosted) and the server copland.udel.edu (where your web pages are hosted.)
So, for your SSIs to work, a few additional steps are needed.
.html files except the navigation.html file, and give them a file extension of .shtml instead of .html index.html to index.shtmlfoobar.html to foobar.shtmlnavigation.html, and change all your hyperlinks to say .shtml instead of .html. <a href="index.html">Main Page</a>, you should have <a href="index.shtml">Main Page</a>If you are doing this step "after the fact", remember to copy your files back up the server again after you do it (i.e. redo Step 7)
Using the SSH Secure File Transfer program again do the following (consult step 6 of lab01 if you are not sure how)
public_html/cisc103/lab04 folder (if you are not already there)public_html/cisc103/lab04 folder by dragging from left to right. Then, check that the web site is readable at the address http://copland.udel.edu/~username/cisc103/lab04 (substituting in your username in place of username).
If it is not readable, check the properties on the folder lab03, and the files inside it, as before. The folder permissions should be 755 and the file permissions should be either 644 or 755 (either one will work.)
Also, look at how the page displays, and whether all the links work. If anything is not right, fix it.
Make sure that your files all have appropriate comments in them, with your own name, date and section number, and a brief description of what your page is.
If you make any changes, after you add the comments in Wordpad or Notepad, copy the files AGAIN with the ssh secure file transfer program. Refresh your browser, and do a "view source" to make sure that the comment shows up in each file.
Specifications for the lab04web site
Grading: 30 points for the navigation.html file, 20 points each for correctly including the SSI directive and CSS in the other three web pages, 10 points for general style issues and correct submission.
Next step: If you haven't done so already, read through Chapter 6 in your Head First HTML textbook.
Also, read the JavaScript Notes from the Wiki
As you read, consult the online reading notes
As you read, you may like to try the examples online. Send me email if I can help in any way, and cc your TA.