How to Install McAfee 8.7 for Windows
The University of
Delaware has obtained a site license for
McAfee anti-virus software. The license permits the use of
this software on all University-owned computers and on all
computers owned by employees and students of the University.
- Read or print these
instructions before you begin to install the McAfee Anti-Virus program.
-
Some programs conflict with McAfee VirusScan. If your computer
has other anti-virus
programs (including other versions of McAfee), you should remove those programs before
installing the UD-customized version of McAfee VirusScan.
Click
here for directions.
- Copy the anti-virus installation
software to your PC.
Install VirusScan
for Windows
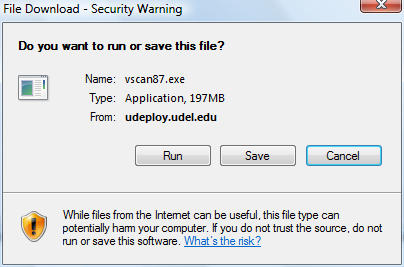
- If you use the Internet Explorer
browser, you will see a screen similar to the following:

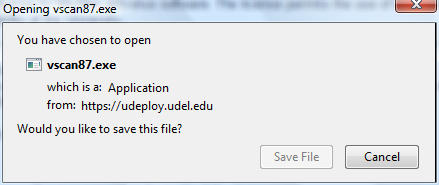
If you use the Mozilla browser,
you will see a screen similar to the following:

- Click Save or Save
it to disk depending on the browser you use.
- If necessary, click OK.
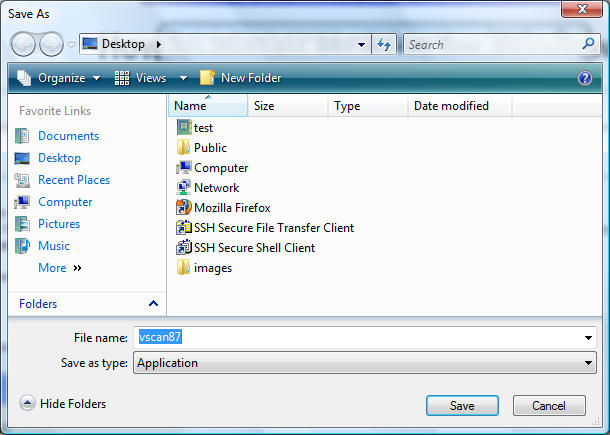
- The Save As dialog box
will appear, which looks similar to the following:

- We suggest that you save
the file on your computer's desktop. If you need to navigate to the desktop,
click on the downward triangle in
the Save in box and highlight the Desktop icon.
Click Save.
- If you see a dialog box that
says Download
complete, click the Close button if necessary.
(Some web browsers close this window automatically.)
- After the file has been
successfully downloaded, close your web browser and look for the following
icon on your desktop.

- Double-click
the icon.
- When Winzip Self-Extractor
finishes, it will automatically install the VirusScan program.
- When you see the message McAfee VirusScan Setup completed
successfully, click OK.
- You will see a batch
screen letting you know McAfee is installing and the
virus definitions are installing.
-
In order to complete the installation, you will need to reboot your computer.
Hit any key when asked to Press any key to continue.
- The computer will
restart.
- You must run
a manual scan after installation.
- You
may delete the
vscan87.exe icon from your desktop.
After Installation
NOTE
You
must run a manual
scan after installation to check for viruses.
After you have installed the UD version of VirusScan, your computer
will be scanned for viruses every Wednesday, if your computer is
on at about noon.
To see the results of automatic scans, you can view
the McAfee log files.
In the future, if you need to run Scandisk or Disk Defragmenter after you
have installed the McAfee anti-virus software, you'll need to disable
VShield
before running these programs.
- Right-click the VShield icon
in the system tray (lower-right corner of your monitor). The icon looks
similar to the first icon in
the following graphic image:

- Click
VirusScan Console.
- Right-click Access Protection and select Disable.
- Right-click On-Access Scanner and select Disable.
- After running Scandisk or
Disk Defragmenter be sure to re-enable VShield by enabling On-Access scanner and Access Protection.
- VShield may also interfere with
the installation process for some programs. Refer to individual program documentation
before installing
any new software. If the documentation indicates
that resident virus-checking should be off during the installation, follow
the previous directions
for disabling VShield. After you have installed
the other software, make sure that you re-enable VShield.
- When you see the red brackets surrounding the VShield, McAfee is scanning and may be writing information to its log files.
With the UD-customized version of McAfee's VirusScan software,
your computer will automatically check for updates when the
software first senses an Internet connection (at system start-up
for computers with a high-speed connections; upon dialing into
UD or another ISP for computers with a phone modem).
In addition, if your system is on and connected, it will
check for updates
daily at 3:00 p.m.
If you need to update McAfee's software manually, follow the directions in the McAfee-provided help files.


![]()