In this lab, you will accomplish several things:
On the SunRays, bring up a web browser. (If you are not sure how to do that, consult the instructions for lab00.)
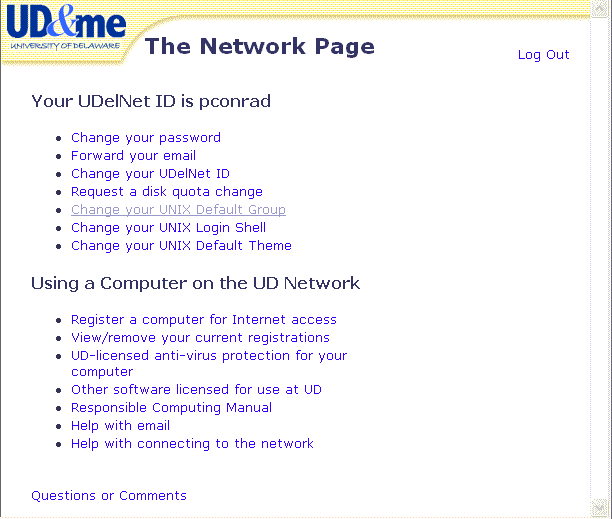
Now, access the web page: http://www.udel.edu/network. On that page, type in your UDelNet username and password.
You should see a screen that looks something like the following.
Click where it says "Change your Unix Default Group". That should take you to the following screen:
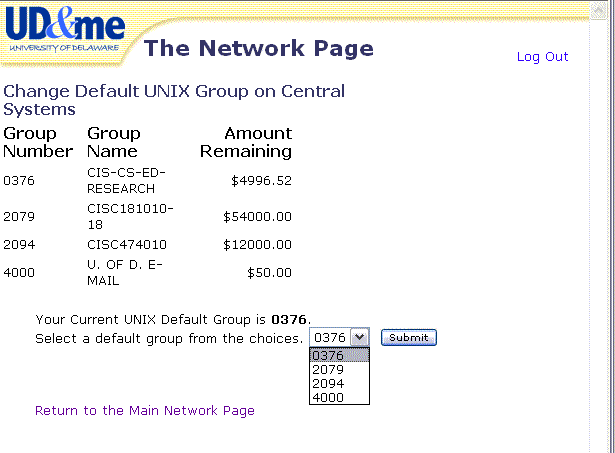
On the example screen above, you will see one of the items on this page is listed as CISC181010-18, which means CISC181, sections 010 through 018. What you should on your screen is the following:
2081 Cisc181
That is the group you should choose if you are in Prof. Conrad's sections for Spring 2006. (If you are in a different class that is using Prof. Conrad's lab files, your instructor will guide you as to which group to choose.) The dollar amount listed might be something like $300 (in my case, it is $54,000, which is the total for everyone in the course.) We'll talk about the "money" in a minute; for now, just know this: it's not real money. It's just pretend money used to track computer usage. You wont get a bill for it. Ever.
In the drop down box shown, select "2081" and hit submit. You are now done with this step, which you should only have to do once per semester.
Let's come back to that $54,000. Because this example is from the instructor account, the "dollar amount" is huge. Your dollar amount as a student will be much smaller, but that's ok. The dollar amount will go down throughout the semester as you use strauss. It should not get below $50. If it does, contact your instructor immediately: he/she can request more "dollars" for your account. You can track your dollar amounts remaining by typing "chdgrp" when you are logged into strauss.
Now we need to change your default login shell. Click where it says "return to the main page". Then click on the option for "Change your Unix Login Shell". That should take you to the following screen:
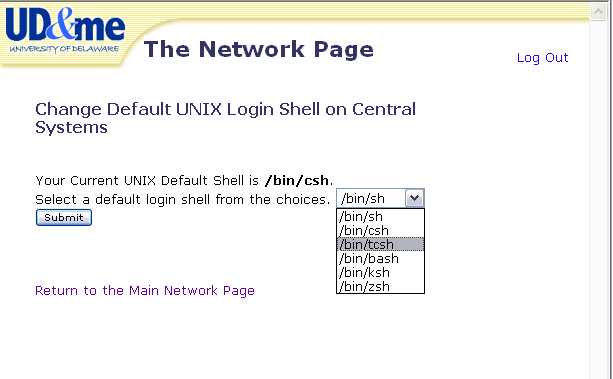
If your current Unix Default shell is csh, you should change it to tcsh by selecting /bin/tcsh from the drop down box, and clicking submit. You can then logout of the UDel Network page. This gives you command line editing (the ability to recall commands with the up and down arrows), as well as nifty things like file name completion (all of which your instructor will demonstrate in lecture.)
If your current Unix Default shell is tcsh, you don't need to do anything; you can log out of the UDel network page.
If your current Unix Default shell is bash, then you are probably already a confirmed "bash" user. The following paragraph is for you. Everyone else can ignore it.
Prof. Conrad writes: is is my intention to eventually migrate this course to "bash" rather that "tcsh". I acknowledge that "bash" is a better shell to teach. We'll eventually cover some "bash" related items in this class. That being said, for the first part of the Fall 2005 semester, you might be better off using tcsh. The reason has to do with the "path" variable you need to get to the compilers (this is new as of January 2005.) They updated the compilers during January 2005. We've tested the commands to access them from tcsh, but not yet from bash. So consider switching your default login shell to tcsh, or "typing in" tcsh after you login to strauss each time. The remainder of this lab, and all further labs (until future notice) will assume tcsh. Until I figure out the new environment as it relates to bash, if you use bash (or any other shell other than tcsh), and your commands don't work, you are on your own to fix it.
If your current Unix Default shell is anything else, then read the paragraph above about bash, because it applies to you as well. Please considering switching to tcsh for the time being.
There is nothing to hand in for this step; your TA can check that you've switched your default login shell by using a script that checks this directly (via the finger command.) We'll also include some steps in a script later on to verify that you completed this step successfully.
Open a terminal window on strauss. In that windows, type the following:
> echo $PATH |
You should see output such as the following. Yours wont' match the following exactly, but it will be in the same form:
> echo $PATH /opt/sfw/bin:/opt/tex/bin:/opt/texutils/bin:/opt/bin:/opt/SUNWspro/bin:/usr/open win/bin:/usr/bin:/usr/ccs/bin:/usr/ucb:/opt/X11R5/bin > |
The command echo $PATH tells the shell to print the value of a so-called environment variable called PATH. This variable contains a "colon-separated" list of directory locations where Unix will look for executable programs when you type in a command. (Windows has a similar concept, and I imagine Mac OS X probably does as well.)
It is important for your path to contain the right list of directories so that you can access the compilers we will use in this course. The locations of the compilers change periodically as the compilers are upgraded to newer versions (to fix bugs, and to incorporate new features into the C and C++ languages). If your account was set up a while back, it may not have an up-to-date path.
There are several files that you can customize in your directory in order to modify your path. These files are typically stored in your home directory on unix (the one you are in when you first login, and the one you return to if you type "cd" at the Unix command prompt.) These files have names that start with a period, which is how Unix implements the concept of "hidden files"; files that start with a period (e.g. .cshrc, .bashrc, .localenv, .emacs) do not typically show up in directory listings unless you specifically request to show hidden files.)
To list the files in your directory including hidden files, use the following command. Note that there is a space between ls and -al:
> ls -al -rw------- 1 pconrad 1173 3391 Oct 19 09:42 %backup%~ drwx--x--x 36 pconrad 4000 8192 Feb 8 20:51 . drwxr-xr-x 226 root other 8192 Feb 8 04:08 .. -rw------- 1 pconrad 4000 2090 Dec 7 10:39 .ICEauthority -rw------- 1 pconrad 0376 2401 Feb 7 16:40 .TTauthority drwx------ 2 pconrad 2265 4096 Mar 11 2004 .Trash -rw------- 1 pconrad 0376 13100 Feb 7 18:05 .Xauthority -rw------- 1 pconrad 4000 814 Jun 11 1996 .ab_library -rw------- 1 pconrad 1173 1894 Nov 9 15:21 .acrorc -rw------- 1 pconrad 1173 237 Nov 9 15:21 .acrosrch -rw------- 1 pconrad 4000 303 Feb 12 1998 .addressbook -rw------- 1 pconrad 4000 2399 Feb 12 1998 .addressbook.lu -rw------- 1 pconrad 4000 3071 Sep 20 1995 .article etc.... |
The files we are most interested is the file .localenv. Type the command:
> emacs .localenv |
or
> vi .localenv |
You are going to add the following lines to your .localenv file. Be sure to type them carefully; if you are off by even one character, this will not work:
if -d /opt/sfw/bin then setenv NEWPATH /opt/sfw/bin:$NEWPATH setenv MANPATH /opt/sfw/man:$MANPATH setenv LD_LIBRARY_PATH /opt/sfw/lib:$LD_LIBRARY_PATH endif if -d /opt/SUNWspro then setenv NEWPATH /opt/SUNWspro/bin:$NEWPATH setenv MANPATH /opt/SUNWspro/man:$MANPATH setenv LD_LIBRARY_PATH /opt/SUNWspro/lib:$LD_LIBRARY_PATH endif |
These lines are written in the "C shell command language", and the .localenv file is what is known as a startup script for your shell.
The first line, if -d /opt/sfw/bin then tests whether the directory /opt/sfw/bin exists or not; this directory contains files for the GNU C and C++ compilers known as gcc (for C programming) and g++ (for C++ programming.) The GNU compilers are "open source" compilers, written by volunteer programmers. If /opt/sfw/bin exists, three setenv commands are used to set the values of three environment variables called NEWPATH, MANPATH and LD_LIBRARY_PATH. These three variables control the path for executables, manual pages, and load libraries respectively (you'll learn more about all three of these over the coming weeks.)
The next few lines do exactly the same thing but for the directory /opt/SUNWspro which contains the latest version of Sun's C and C++ compilers. These compilers are produced commercially by Sun Microsystems, the manufacturer of the strauss computer system. Until recently, these were closed source, proprietary compilers (they cost money). I don't know if that is still true or not; that may have changed. In any case, the development history of these two compilers is quite different. Although correctly written programs should produce the same results from both compilers, incorrectly written programs can produce very different error messages or error behavior. Comparing the results from both compilers can be very helpful in debugging, so it is important to be able to use both.
Once you have made the changes in the .localenv file, save the file and logout, then log back in.
You should then be able to do the following commands, and get exactly the results shown. These results indicate that you are able to use the correct versions of both the GNU and Sun compilers for both C and C++. If your output does not match that in the box below, review the .localenv file and try again, and/or ask your TA or instructor for assistance before proceeding.
> which gcc /opt/sfw/bin/gcc > which g++ /opt/sfw/bin/g++ > which cc /opt/SUNWspro/bin/cc > which CC /opt/SUNWspro/bin/CC > |
The which command tells you the full path of the file that gets executed if you type in a particular command. For example, in the script above, you see that if you type in gcc, the actual file that gets executed is /opt/sfw/bin/cc. You'll include the commands above in a script later in this lab; for now, once you are successful in getting the output above, you are done with this step.
mkdir cisc181
This will create a directory called cisc181, in which you can store your files for this course. If you type "ls" immediately after doing this, you will see the new directory listed among your files. Since this directory is "under" the home directory, we call it a "subdirectory" of your home directory.
    mkdir lab00

    mkdir lab01
mv lab00.dat ~/cisc181/lab00
In this step, you will enter the traditional "first C++ program" just to make sure that you understand how to create a C++ program, compile it, run it, and script it.
// lab01a.cc Jane Doe doej@udel.edu 09/01/04 int main(void) |
CC lab01a.cc
OR
g++ lab01a.cc
The first command (CC) is a commercial compiler, supplied by Sun Microsystems. The second command, g++ is an open source compiler, supplied by the GNU project, which is staffed by volunteer programmers. From time to time, we may discover differences, but for now, I don't care which one you use. Sometimes if you have a tricky syntax error it is useful to try both, because sometimes one gives you more useful error messages than the other.
./a.out
You might be able to get away with just typing a.out without the leading ./, or you might not; it all depends on how your account is set up. (It has to do with the Unix concept of the "path"; you'll read about that in the Anderson text later on.)
If all goes well, you should see something like the following:
> CC lab01a.cc |
Note that you must be careful when using the script command. The script command will wipe out your work if you are not careful!
The thing to remember is: on the command line, type "script" followed by the name of a .txt file; for example:
script lab01a.txt |
This is correct!!!! |
Never put "script" followed by the name of a .cc file. It will wipe out your .cc file!
script lab01a.cc |
WRONG!!! WRONG !!!! WRONG!!!! |
Ok, now that we have that out of the way...
Type "script lab01a.txt". Then go through the following steps:
qpr -q whlps lab01a.txt
And finally, you are done with Goal 4! We'll return the file lab01a.txt and lab01a.cc files in the final step of this lab, where you'll submit those to WebCT along with the files you create in Goal 5:
cp /www/htdocs/CIS/181h/pconrad/06S/work/labs/lab01/lab01b.cc .
The "cp" command in Unix is used to copy a file. The file is copied
from a directory under Prof. Conrad's home directory. Note that ~ by itself
refers to "your home directory", but "~pconrad" refers to "pconrad's home
directory". Similar, you can refer to any user's home directory on strauss
if you know that user's login name; e.g. jsample's home directory can be
accessed via "ls ~jsample". cp /www/htdocs/CIS/181h/pconrad/06S/work/labs/lab01/lab01b.cc ~/cisc181/lab01
cat lab01b.cc

  g++ lab01b.cc

  ./a.out
Did you get it right? Note: you could also have done "more lab01b.cc"
in the first step (if the file is too large to fit on the screen all at once),
and "CC lab01b.cc" for the second step.
        echo $PATH

        which g++

        which CC

        cat ~/.localenv
        cd ~/cisc181/lab01

        pwd

        ls

        cat lab01b.cc

        CC lab01b.cc

g++ lab01b.ccrepeat this step with several different inputs
./a.out
exitto end the script
qpr -q whlps lab01b.txtwhlps to smips to print in the basement of Smith Hall, or prsps to print at the Pearson Hall computing site. For the final version that you submit to the TA, you should always print in one of these places, not on your home printer.) Move immediately on to lab02.html
![]()
